Later in my freelance career, I learned the term value-based pricing. It’s a pricing strategy where the price of my service is set based on the value it provides.
This shifted on how I look at things. I started looking at how businesses generate revenue and focus where I could help increase it or reduce costs, then I anchor my rate based off that. It worked well for me. I gravitated to companies where my skills truly added value, which made my work more enjoyable. Hindi lang basta pera.
Thinking this way has become second-nature.
Now, I try to apply it in reverse: value-based giving.
For instance, if I needed a medicine now, I’d book Grab Pabili to have someone buy it for me and bring it to my house. The time and energy I save are worth more than the total cost of the service. It makes it easy to give extra.
Another way I apply it is when I have to hire for help. I don’t haggle. I hire people to get to the same goal, I want to reach it where everyone feels they are paid fairly. Then add extra upon completion.
I’ve been in a state of catching up for a couple of months now. Months! It’s frustrating, to say the least. I can’t perform at my best, I don’t feel good about myself, which sinks me deeper.
One of the biggest source of frustration is not being proud of what I produce.
Nobody operates 100% all the time.
I think for now, I should accept that I’m not back at that level yet.
Focus on small wins.
Try to increase capacity
The effective way to increase my capacity is to exercise. A mix of interval and endurance training. It feels counterintuitive to make time for this when my time and energy are already limited, but I distinctly remember when I was regularly doing it, my stress response was better. I’m more fight than flight.
TODO: Bring workout equipments from office to home to have less friction working out
Make fast decisions
With a lot on my plate, I often get stuck which to get started to. It does not matter which, flip a coin. Make fast decisions.
What’s the worse thing that could happen?
Sometimes the body has a disproportionate response to a situation.
A good way for reality check is to ask: what’s the worst thing that could happen?
I get fired. That’s it. It’s not the end of the world if it happens.
I have a solid emergency fund in place, and we haven’t fallen too deep into lifestyle inflation. My family can easily adjust if needed. Plus, there’s still strong demand for my specific skill set.
–
Anyway, I’m pretty sure this isn’t going to be forever (anicca). Hoping to catch-up soon!
I have too many ongoing projects. It perfectly reflects the state of my mind. Everything is in my head, without structure.
No project management, no direction, no goal or pressure to finish.
What’s happening is I start a new project. I get stuck or I get to a point that I have to make a decision but for some reason can’t. I let it simmer in my head. Then I start a new project.
The worst part is that my office has become an ever-growing pile of unfinished projects.
Possible solution
One solution I’ve come up with is to pre-decide in advance what I should do each day and then consistently follow through. I call this approach “Project DOTED,” which stands for “Do One Thing Everyday.”
Criteria
To help with the decisions on what to do, these are the guidelines:
Focus on things that would reduce clutter in my office
Small enough that it can fit in my family and work life.
Notable enough that it chip-off towards a completion of a project
Lastly, avoid new projects. Purchase freeze until things are manageable again.
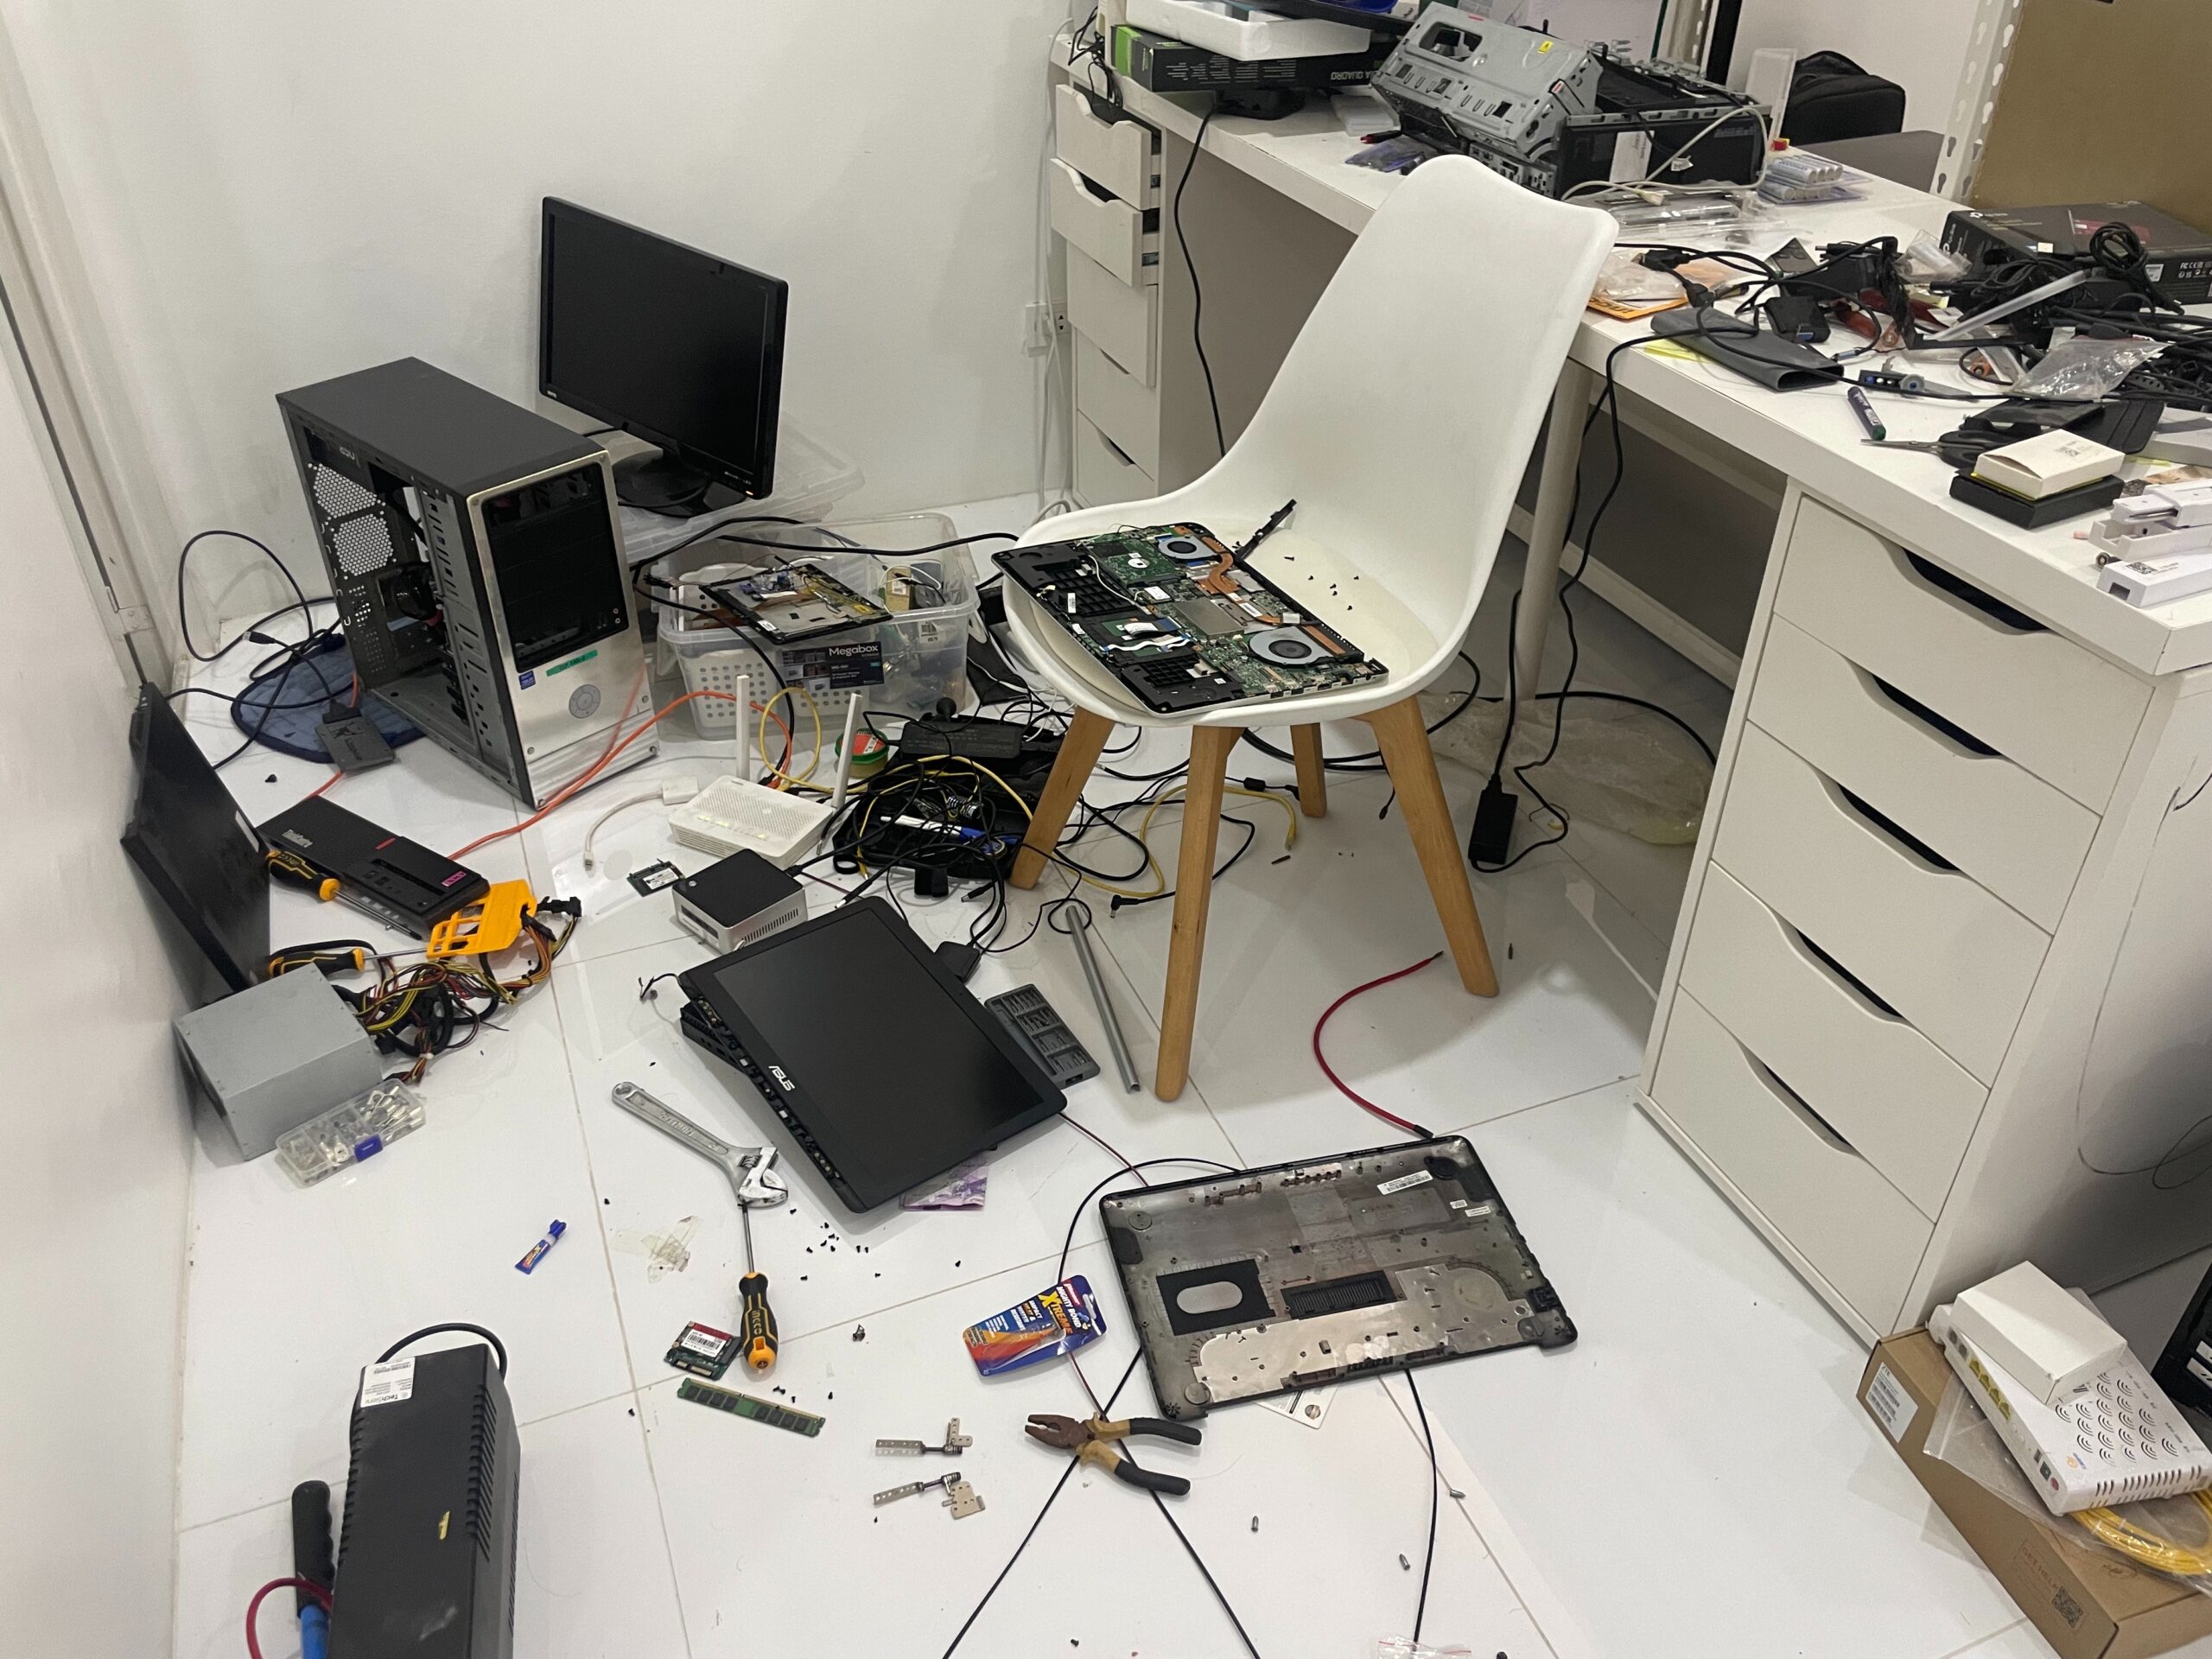
This was the state of my homelab. Whenever I go at my server room and attempt to arrange things, I get paralyzed how to get started.
Primary blocking reason is how I should handle supplying power. Currently I have 2 separate line-interactive UPS. One for critical internet-related devices, the other for optional servers.
My original plan was to make a DIY UPS using devices for solar. I “thought” it was cheaper. I planned to use:
ATS (automatic transfer switch) if I have to have a maintenance, servers will keep running
SNAT 1kw inverter – act like a line-interactive UPS
Used LifePO4 battery
Rack DIN rail for safety devices – ATS, breakers, DIN power plug
I already bought the components but assembling everything was daunting. I had a safety concern mixing high-voltage devices to the same rack as the server. The rack DIN rails would also have exposed live wires and I wasn’t comfortable with the plan. I purchased before I thought through the plan.
I was in a limbo on how to proceed. My homelab has been in this state for more than a year.
Finding a reasonably-priced On-line UPS
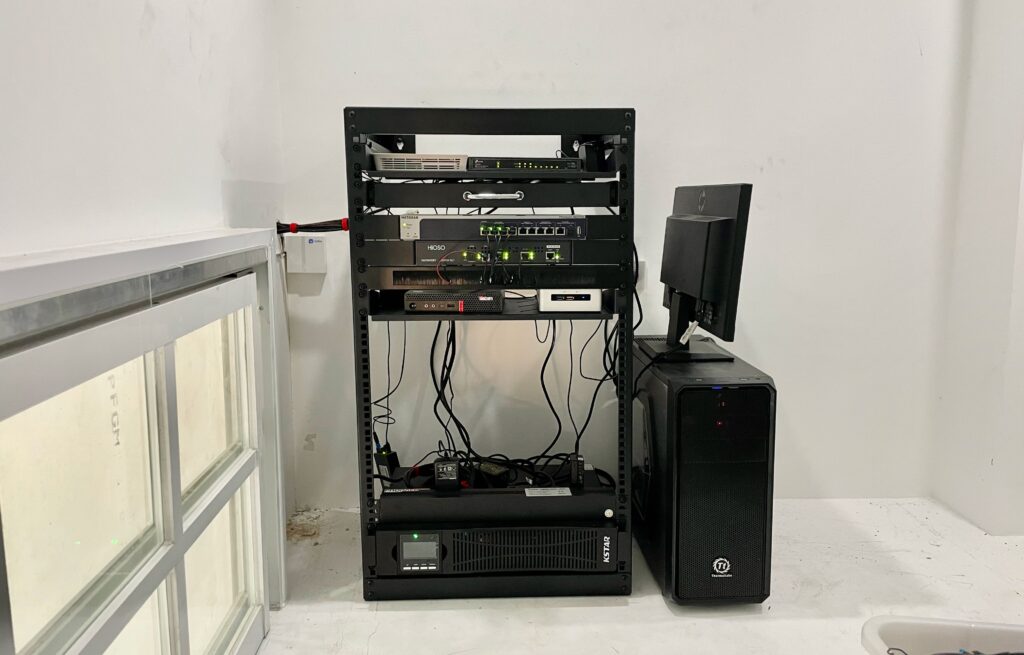
I finally found a reasonably priced online UPS. It’s on-line meaning it has double conversion 230v AC -> 24v DC -> 230v AC. Any power fluctuation won’t reach the devices.
It’s KSTAR YDC9101S RT. It’s only 900w as I don’t intend to run anything more than that. It has a user replaceable battery. It can be replaced while plugged-in. And it can be rack-mounted!
Cost is 10k, including shipping. This is cheap as compared to other on-line UPS I checked. Second-hand UPS without battery is easily around 20k. So I bit the bullet and purchased it.
A proper UPS, finally.
Plan of action
I knew I’ll rabbit-hole to something else when I start working on my homelab. There’s always something else to do. What I did was list what I wanted to accomplish for the day and limit myself to 2 hours.
Remove 2 line-interactive UPS
Remove shoe rack
Remove TP-Link 16-port Swtich
Install KSTAR UPS
Install 10GBe Netgear Switch
Install rack drawer
With a clear plan of action, I started.
Removing deprecated stuff
Shoe rack – I used this as a poor man’s rack. It become unmanageable quickly
16-port TP Link switch – turns out I don’t use more than 8 ports anymore. With a new 10Gbe switch, it’s more than enough
2 extension cord
2 UPS with modified batteries
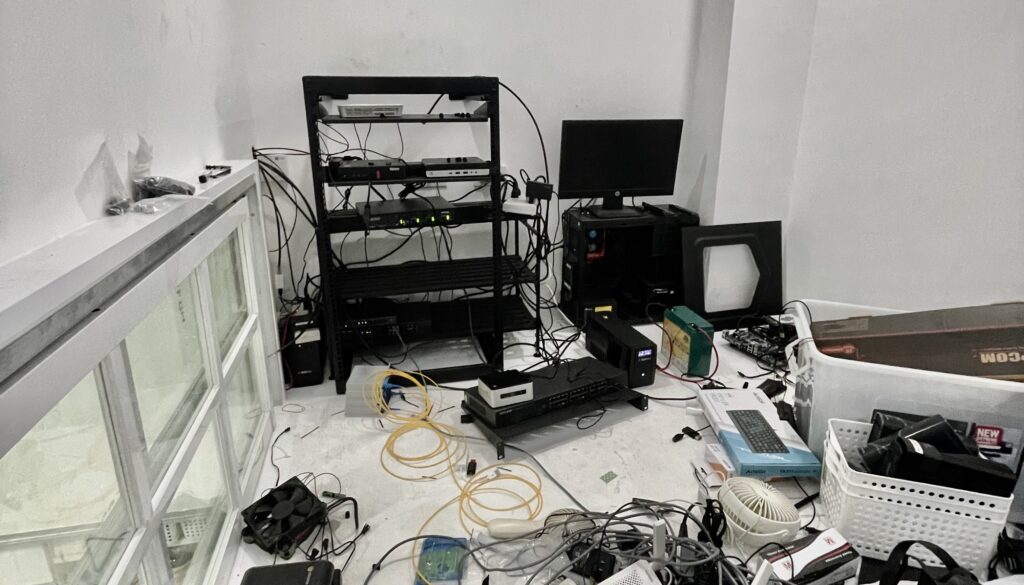
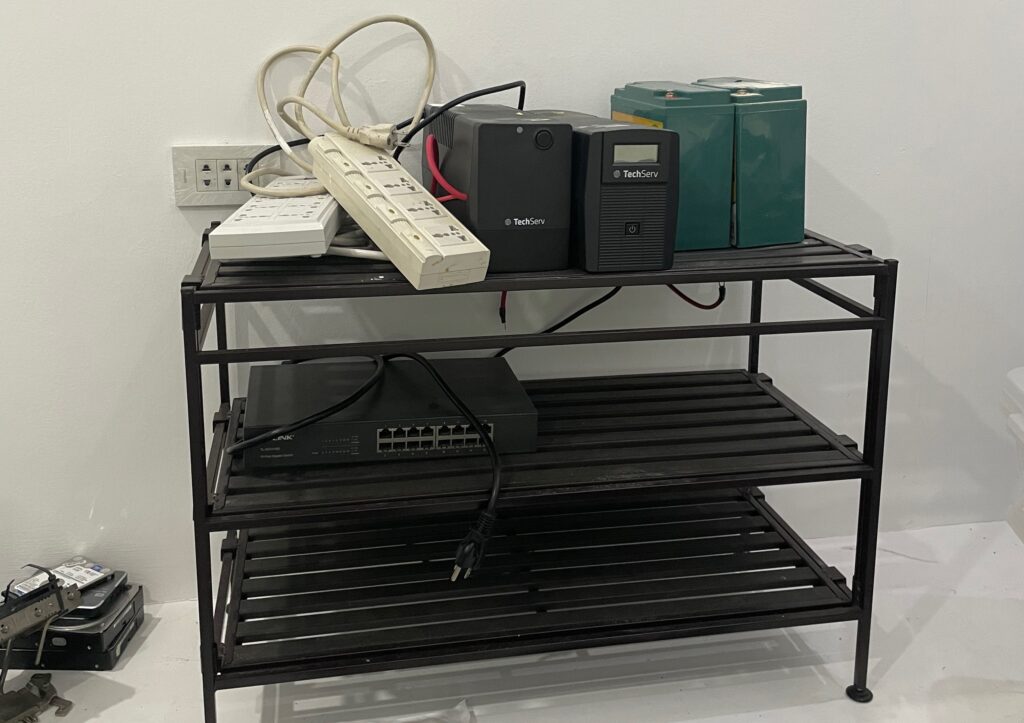
Installing new stuff
After clean up
KStar On-line UPS (bottom)
Netgear 10Gbe Switch
Rack sliding cabinet – I felt like I needed this to put loose items such as USB keyboard and mouse, extra SFP modules, rack screws. I had instances where I spent an afternoon looking for those.
Finished everything in 2 hours. Listing out what I want to accomplish was handy. It keep me on-track. I feel good about the progress I made with my homelab.
I’ve been working on a migration script for a couple of hours. I thought I’m done with the hard part of API calls, creating a new workspace, configuring the workspace to make it work.
The remaining task involves updating the configuration code itself to point to the new service provider. I didn’t anticipate spending hours on this since it’s a straightforward text manipulation. I expected this to be something I already knew how to do.
Previously, my approach was to exhaust all possible solutions on my own, often waiting until the last minute before asking. I don’t want to risk appearing like a fool.
Now, I’ve adopted a different approach. I ask for help proactively and provide updates on the steps I’m taking in the process. The team can respond if they knew the answer and if they got time.
It’s just a question! A single question could not possibly define my overall skill level.
The responses I got have been helpful, and I was able to complete my task.
I used to be sold to the idea of sharing economy. Uber, AirBnb, and not owning things. It fits well with my minimalist lifestyle.
I distinctly remember trying my first Uber ride. At that moment, I thought “Why would I need a car? A car that I have to maintain, and buy insurance for”. I even considered limiting everything I own in a backpack, which would allow me to move wherever I want, whenever I want.
Owning a car
Sure, owning a car is more expensive overall. But it buys me freedom. Uber is convenient only to places where they operate, at the time when there’s a demand. With a car, I have the flexibility to travel on my terms, have my own private space. I don’t have to worry about whether I can book a ride to the specific place I want to go at any given time.
Owning a place
“Most people, Kamala, are like a falling leaf, which is blown and is turning around through the air, and wavers, and tumbles to the ground. But others, a few, are like stars, they go on a fixed course, no wind reaches them, in themselves they have their law and their course”
Siddhartha
Sure, being able to move at whim seems nice. Having tried it though, I felt lost. “What the hell am I doing? What am I trying to prove?” is what I remember thinking when I was moving to my 4th hostel.
Having my own place allows me to establish roots. It gives me a home, a space where I feel at ease and can be myself, doing things that suit me. Unlike renting, where even something as simple as putting a nail in the wall requires permission, ownership offers the freedom to make decisions about the space without constraints.
Owning a decision
Ownership extends beyond material things, it includes decisions too. When I own a decision, I take responsibility for the resulting outcome. Regardless if it’s good or bad.
If in my mind it’s somebody else’s fault, how the hell can that help? Owning a decision puts myself in a position where I can correct myself when I acknowledge I made a bad move.
–
Ownership comes with higher costs — more money, more responsibility, more time and effort. However, the sense of having more influence over the direction of my life makes it worth it for me.
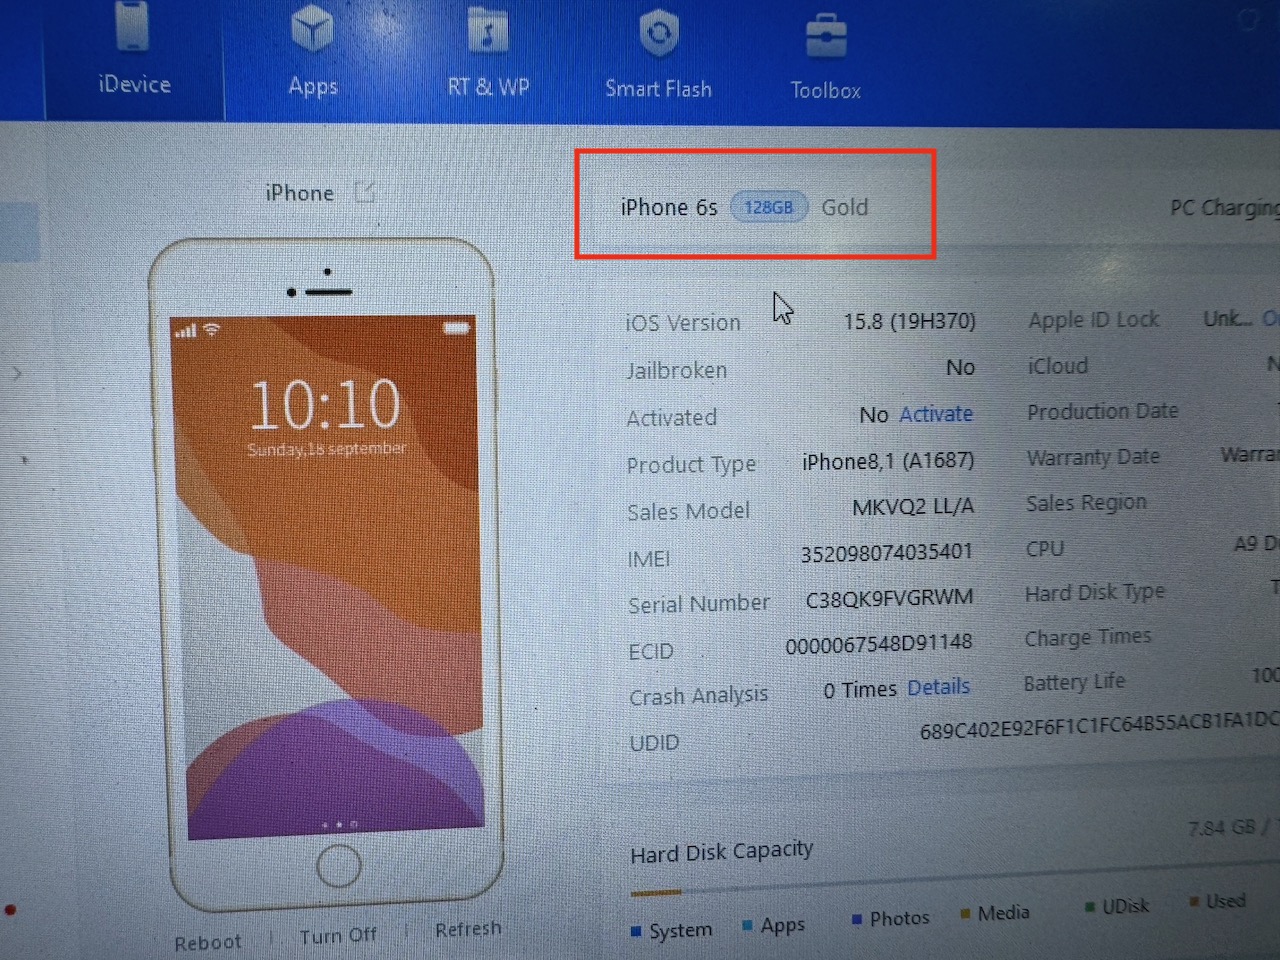
I stumbled upon a video that upgrades an iPhone 6s from 16gb to 128gb a couple of years back. It was super fascinating to learn that it was possible at all. It remained at the back of my head.
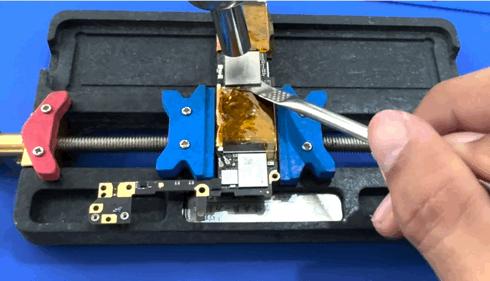
Years later (this year), I finally pulled the trigger to try it out when I found out that tools needed to do it are relatively cheap, and a broken 8-year-old iPhone 6s are cheap too. I have zero soldering skills, let alone microsoldering. But I just had to try it.
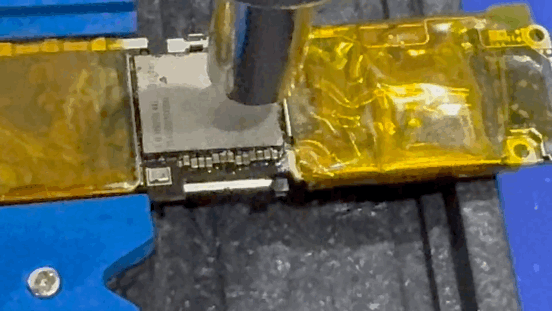
First attempt: broke the PCB pads
Too much force pulling out the NAND IC
The NAND IC is the actual storage and what needs to be replaced to upgrade. What I did not expect was it’s soldering back the IC that’s the easy part. Removing the factory-soldered IC is hard because aside from the solder itself sticking to the motherboard, there’s an underfill that acts as an adhesive too.
I’m not supposed to put force pulling it out, but I did not know nor have the experience to know which is which.
If the PCB pads are broken, it’s connection to wherever it’s supposed to connect is gone.
Giving up: maybe this is not for me
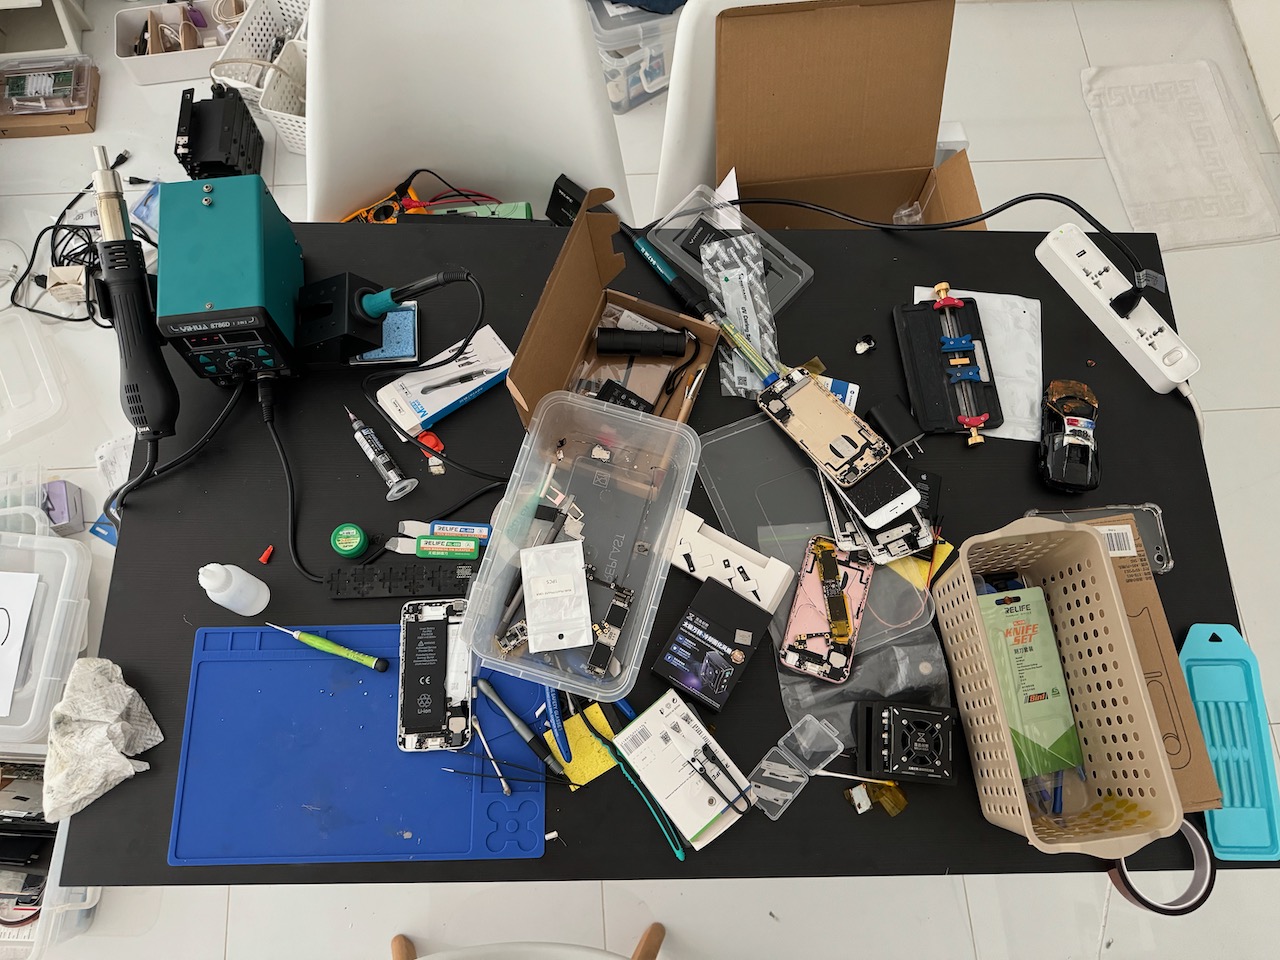
Workbench with failed upgrades
I burned through 3 iPhone 6s at this point and I kept doing the same mistake of breaking the PCB pads. I’m losing hope and very frustrated and started questioning why I’m doing this at all.
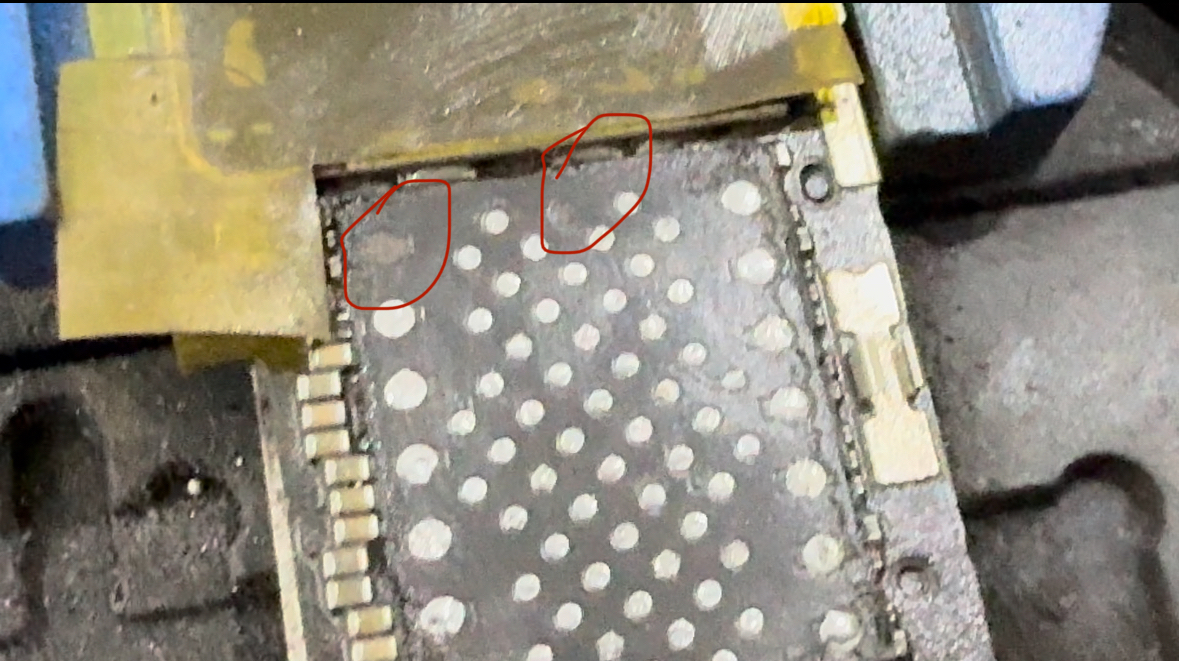
Broken pads on my 4th attempt
Luckily, on my 4th attempt, the pads I’ve broke turned out to be “redundant” pads. It means as long as at least one can make a good connection, it will still work.
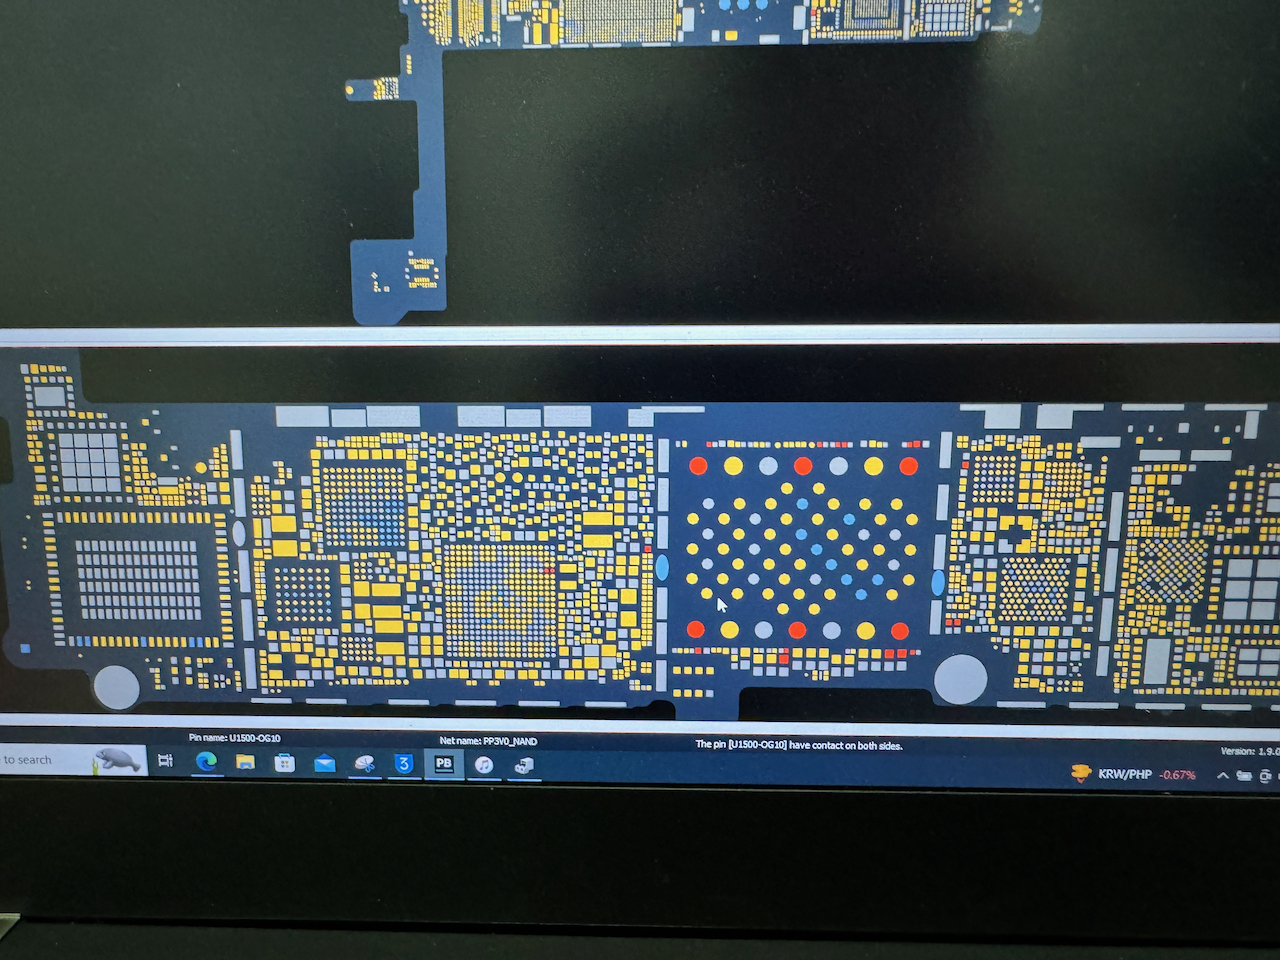
Board view of an iPhone 6s. Red dots are redundant pads. It connects to the same end point.
Super happy when I learned this!
Reballing and putting back the NAND
To put back the NAND IC, it needs to be reballed. Reballing is putting back the solder on it’s connection points that will be then used to connect back to the motherboard.
I used a medium-temperature solder paste with BGA70 stencil. This turned out to be easy and fun to do.
Putting it back is as easy as placing it in the correct orientation and heating it up. There will be a small movement as it place itself when the solder melt.
Finally made it work!
All these happened in span of weeks. For every failed attempt, I had to source another cheap broken iPhone 6s. I can only try again if I have another phone available. So there’s a lot of pent-up frustration.
I haven’t been able to clean up one of my tables because I haven’t finished this hobby yet. All the parts are scattered around, and it’s still a work in progress.
So when I finally made it, I felt so relieved. I can finally move on.
Things I learned:
Previously, my approach to malfunctioning electronics was simple: if it didn’t power up, the whole component has to be replaced. Board-level repair was not even considered. Now, I’ve become more comfortable with electronics, and I’ve gained a better understanding of how they work.
Electronic components can surprisingly withstand a lot of heat. My hot air workstation is set at 360C to remove and put back components, and it still work!
It’s hard to do microsoldering without a microscope. But a microscope’s price is hard to justify for something I do not do professionally. It costs around 14k. So I tried to make do with my 20/20 vision and my phone’s macro lens.
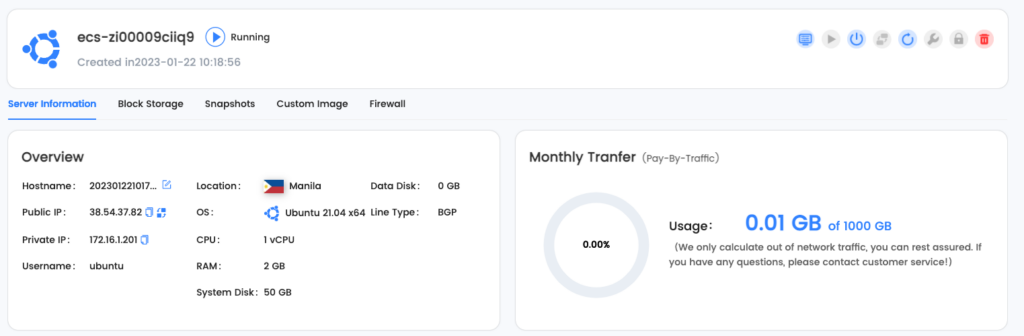
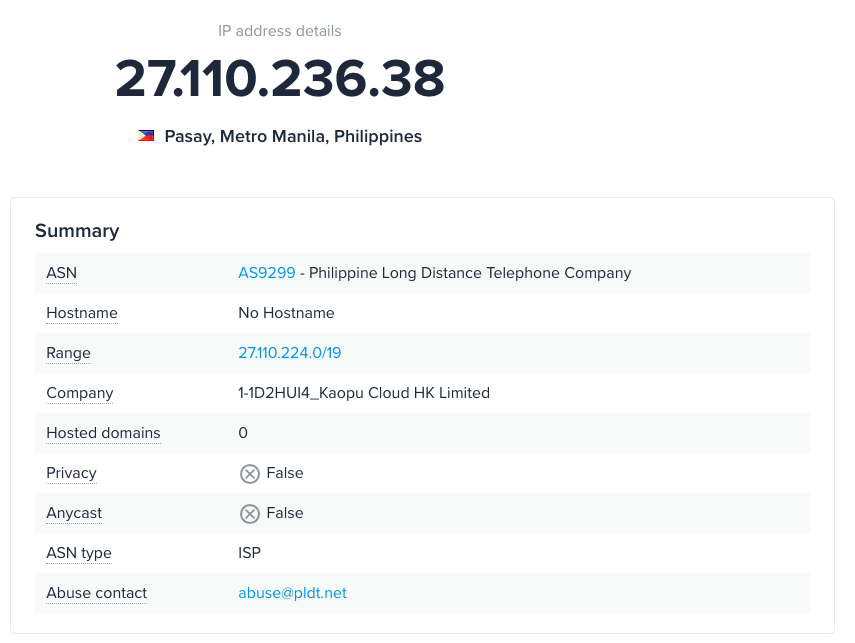
When I learned the term about multihoming, I revisited my interest again to have a VPS (Virtual Private Server) to setup as a VPN (Virtual Private Network) for my home network.
I wanted it to be hosted in the Philippines because of latency. Major hosting providers uses Singapore or Hong Kong to cater the PH market. But the latency is just too high at around 30ms.
I found one in LightNode. The cost is reasonable too for $7.7 USD/month.
LightNode’s dashboard
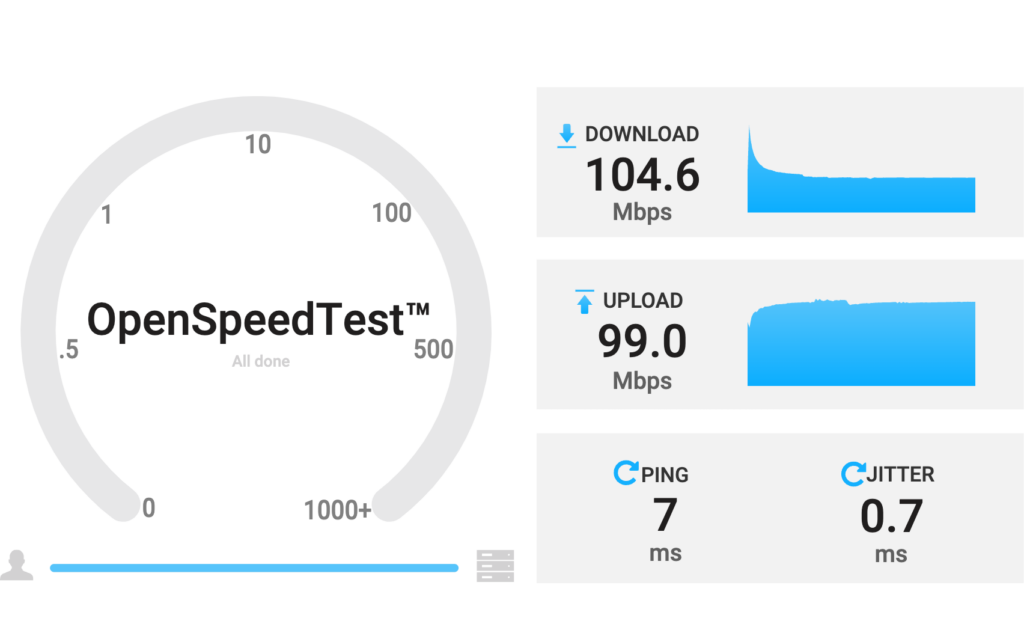
The drawback is it looks to be limited to 100mbps only. Which is still reasonable.
Speed test from/to VPS to my home internet
Checking the hops, it looks like they are hosted within PLDT’s data center:
IP information
This is why the latency is at a very good range of 7ms. It does hop at one NAT which I think adds the 2ms. Overall this is good.
I’m going ahead and continue to use this and integrate it with my home network setup.
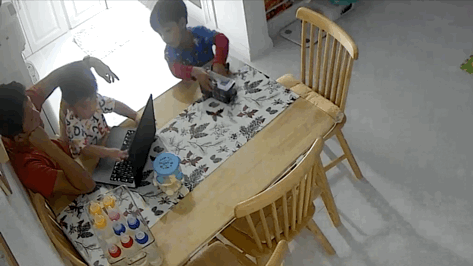
I used to think that I needed a separate workspace because working from home was challenging due to my kids. They would close my laptop, type on it, and constantly demand my attention, making it difficult to work.
While it’s partially true, I realized that it’s not the main reason.
My main reason for needing a separate workspace is rooted in my values that family comes first. Given the choice between working and attending to my kids, prioritizing my kids is a no-brainer. Whenever they are around, it’s tough choosing anything else because I know that it’s not forever that they’d want me around. I just got to enjoy it while they do.
I still have to work though. Being physically away from my kids allows me to do my job and be able to provide.
It’s a small nuance, but the end result is still the same — I have to be away working.
This is more on resolving an internal conflict when I have to work long hours. There are instances I question myself “Akala ko ba priority family? Ba’t puro ako trabaho?”. Now, I have a clear answer.
Ever since two of our kids started school at different schools with different schedules, I’ve been trying to figure out a way to still effectively work.
Here’s what I’m trying to follow:
My goal is to have an 8-hour workday. I divide this to four 2-hour blocks.
Daily Planning
In daily planning, I try to be specific with what I want to accomplish on each block. Once that’s clear, I try to do tasks that takes less than 5-minute to do if I have the energy (most of the time I don’t and procrastinate 😛).
Operations Work
The initial 2-hour block mostly involves handling operational tasks for Human Made. During this period, I address change requests, support tickets, and emails. This works well because I’m usually the only person available around this hour. I can respond faster to our APAC customers.
It’s also good for me as it puts my head in to work mode.
Sprint Work / Meetings
In the following 2-hour blocks, the tasks are mixed bag. Sometimes more support work if there’s an active incident happening, sometimes I’m able to focus on sprint work.
Working in the evening enables me to participate in meetings with my team. This timing works well as those in the EMEA region are in their mid-day, and those in the Americas are just starting their day.
–
This schedule is not something I can consistently follow. Some days, completing even a single task is a struggle, while on other days, I effortlessly breeze through my to-do list. It’s a give-and-take scenario. When I’m struggling, I spend more time to work to still deliver, and during good periods, I spend more time at home. It’s a recurring cycle.
I think plans isn’t meant to be followed to the dot but rather to provide guidance and structure. Having things pre-decided makes it easy to get back on track when I feel lost.