I hit the VLAN 1 failure pattern while migrating from a consumer TP-Link managed switch to a Juniper EX2200. The configs looked equivalent, but the behavior was not.
Consumer switches are forgiving:
Trunk ports behave like access ports with extras
“Allow all VLANs” plus PVID feels safe
End devices often work on trunks accidentally
On the EX2200:
Trunks are for VLAN-aware devices only
Native VLAN is not a substitute for access ports
VLAN 1 must not be implicitly tagged
Ambiguous configs are accepted but behave differently
The fix was mostly mental model. Once I treated trunks as trunk-only and made VLAN intent explicit everywhere, VLAN 1 behaved and DHCP stopped failing silently.
After resizing the VM disk at the host level, OPNsense does not automatically
use the extra space. gpart show may report the disk as corrupt. This is
expected.
What is actually happening is the backup GPT header is still at the old end of
the disk.
Fix
Enter the console shell.
Repair GPT metadata. This does not touch data.
gpart recover ada0
Resize the root partition. On a default UFS install this is freebsd-ufs,
usually partition 3.
gpart resize -i 3 ada0
Grow the filesystem.
growfs /
Verify.
df -h
Notes
Applies to UFS installs
The corruption warning after a disk resize is normal
This is a reference note for configuring VLANs on a Juniper EX2200, written
after running into a subtle but repeatable failure mode around VLAN 1.
If you are migrating from a TP-Link managed switch, start here:
Migrating from a TP-Link Managed Switch to Juniper EX2200.
The short version: the EX2200 is strict. Ambiguous VLAN configuration will not
fail loudly, but it will break untagged traffic in ways that are easy to
misdiagnose.
Core concepts that matter on EX2200
default should be explicitly set to VLAN 1
VLAN 1 uses tag value 0
A trunk port with a native VLAN is not equivalent to an access port
vlan members all is dangerous when a native VLAN is present
If you remember nothing else, remember the last point.
The failure pattern
This configuration looks reasonable but breaks VLAN 1:
Port mode: trunk
Native VLAN: 1
vlan members all
In this state:
Tagged VLANs work
Untagged VLAN 1 does not
DHCP fails silently
Clients, AP management, and anything relying on untagged traffic break
The switch is doing exactly what it was told. The problem is that VLAN 1 ends up
treated as both tagged and untagged.
The working model
The EX2200 behaves predictably when VLAN intent is explicit.
Access ports
Used for non VLAN-aware devices
Untagged only
VLAN 1 only
Trunk ports
Used for VLAN-aware devices
Native VLAN 1 for untagged management traffic
Explicit list of tagged VLANs
Never use all
Never include default
This maps cleanly to common homelab gear:
Wired clients and CCTV use access ports
Omada access points use trunks with native VLAN 1 and tagged SSID VLANs
Proxmox hosts use trunks with native VLAN 1 and tagged VM VLANs
OPNsense uplinks use trunks with native VLAN 1 and explicitly listed VLANs
set interfaces ge-0/0/X unit 0 family ethernet-switching port-mode accessset interfaces ge-0/0/X unit 0 family ethernet-switching vlan members default
Use for:
Laptops
CCTV
Any non VLAN-aware device
Trunk port with native VLAN 1
set interfaces ge-0/0/X unit 0 family ethernet-switching port-mode trunkset interfaces ge-0/0/X unit 0 family ethernet-switching native-vlan-id 1set interfaces ge-0/0/X unit 0 family ethernet-switching vlan members [ vlan2 vlan100 vlan2000 ]
Rules:
Never use vlan members all
Never include default
Native VLAN carries VLAN 1 implicitly
Omada access point trunk
set interfaces ge-0/0/X unit 0 family ethernet-switching port-mode trunkset interfaces ge-0/0/X unit 0 family ethernet-switching native-vlan-id 1set interfaces ge-0/0/X unit 0 family ethernet-switching vlan members [ vlan2 vlan100 ]
OPNsense uplink trunk
set interfaces ge-0/0/47 unit 0 family ethernet-switching port-mode trunkset interfaces ge-0/0/47 unit 0 family ethernet-switching native-vlan-id 1set interfaces ge-0/0/47 unit 0 family ethernet-switching vlan members [ vlan2 vlan100 vlan2000 ]
Proxmox host trunk
set interfaces ge-0/0/46 unit 0 family ethernet-switching port-mode trunkset interfaces ge-0/0/46 unit 0 family ethernet-switching native-vlan-id 1set interfaces ge-0/0/46 unit 0 family ethernet-switching vlan members [ vlan2 vlan100 vlan2000 ]
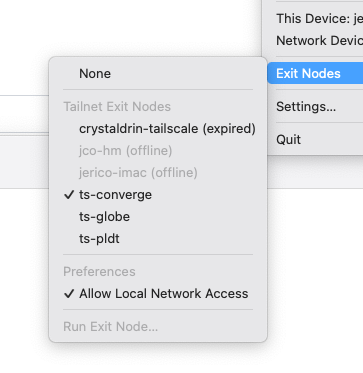
I wanted to create 3 Tailscale exit nodes for my 3 ISPs: Globe, PLDT, and Converge. I’m thinking of using it as a DIY VPN because sometimes some sites are slow on an ISP.
I mapped each VM to different VLAN specific to the ISP it will use.
Issue: Duplicate node key
I encountered an issue where when I clone a VM with running Tailscale, running tailscale up results in the same node key. To reset the node key, I had to:
apt-get remove tailscalerm -r /var/cache/tailscalerm /var/lib/tailscale/tailscaled.stateapt-get install tailscaletailscale up -reset
When I learned the term about multihoming, I revisited my interest again to have a VPS (Virtual Private Server) to setup as a VPN (Virtual Private Network) for my home network.
I wanted it to be hosted in the Philippines because of latency. Major hosting providers uses Singapore or Hong Kong to cater the PH market. But the latency is just too high at around 30ms.
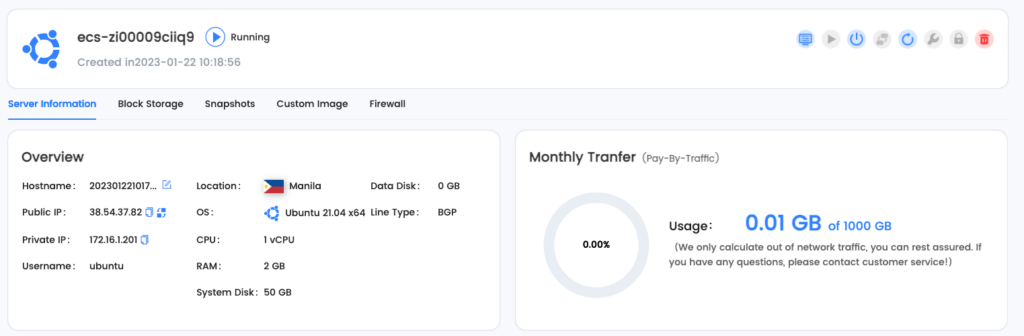
I found one in LightNode. The cost is reasonable too for $7.7 USD/month.
LightNode’s dashboard
The drawback is it looks to be limited to 100mbps only. Which is still reasonable.
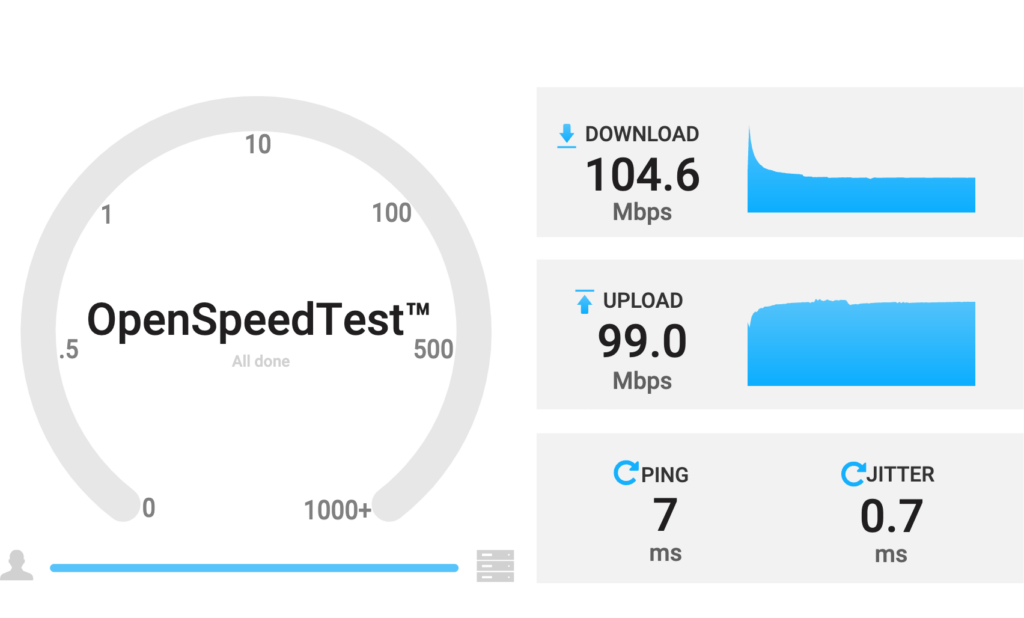
Speed test from/to VPS to my home internet
Checking the hops, it looks like they are hosted within PLDT’s data center:
IP information
This is why the latency is at a very good range of 7ms. It does hop at one NAT which I think adds the 2ms. Overall this is good.
I’m going ahead and continue to use this and integrate it with my home network setup.
One of the hobbies I picked up this year was to be an Internet Service Provider (ISP) wannabe using Fiber to the Home (FTTH).
I was just so fascinated with FTTH technology and how accessible acquiring the equipment needed to implement it. It’s expensive, but not out-of-reach expensive. Imagine the jump of technology from CAT6 (4 pairs of copper wires) limited to 100 meters, to a single strand of fiber than can support over 100 km length at faster speed! It’s super fascinating for me.
I kept researching how it works. Knowing myself, I will only learn if I put skin in the game.
In the process, I learned a ton of new acronyms:
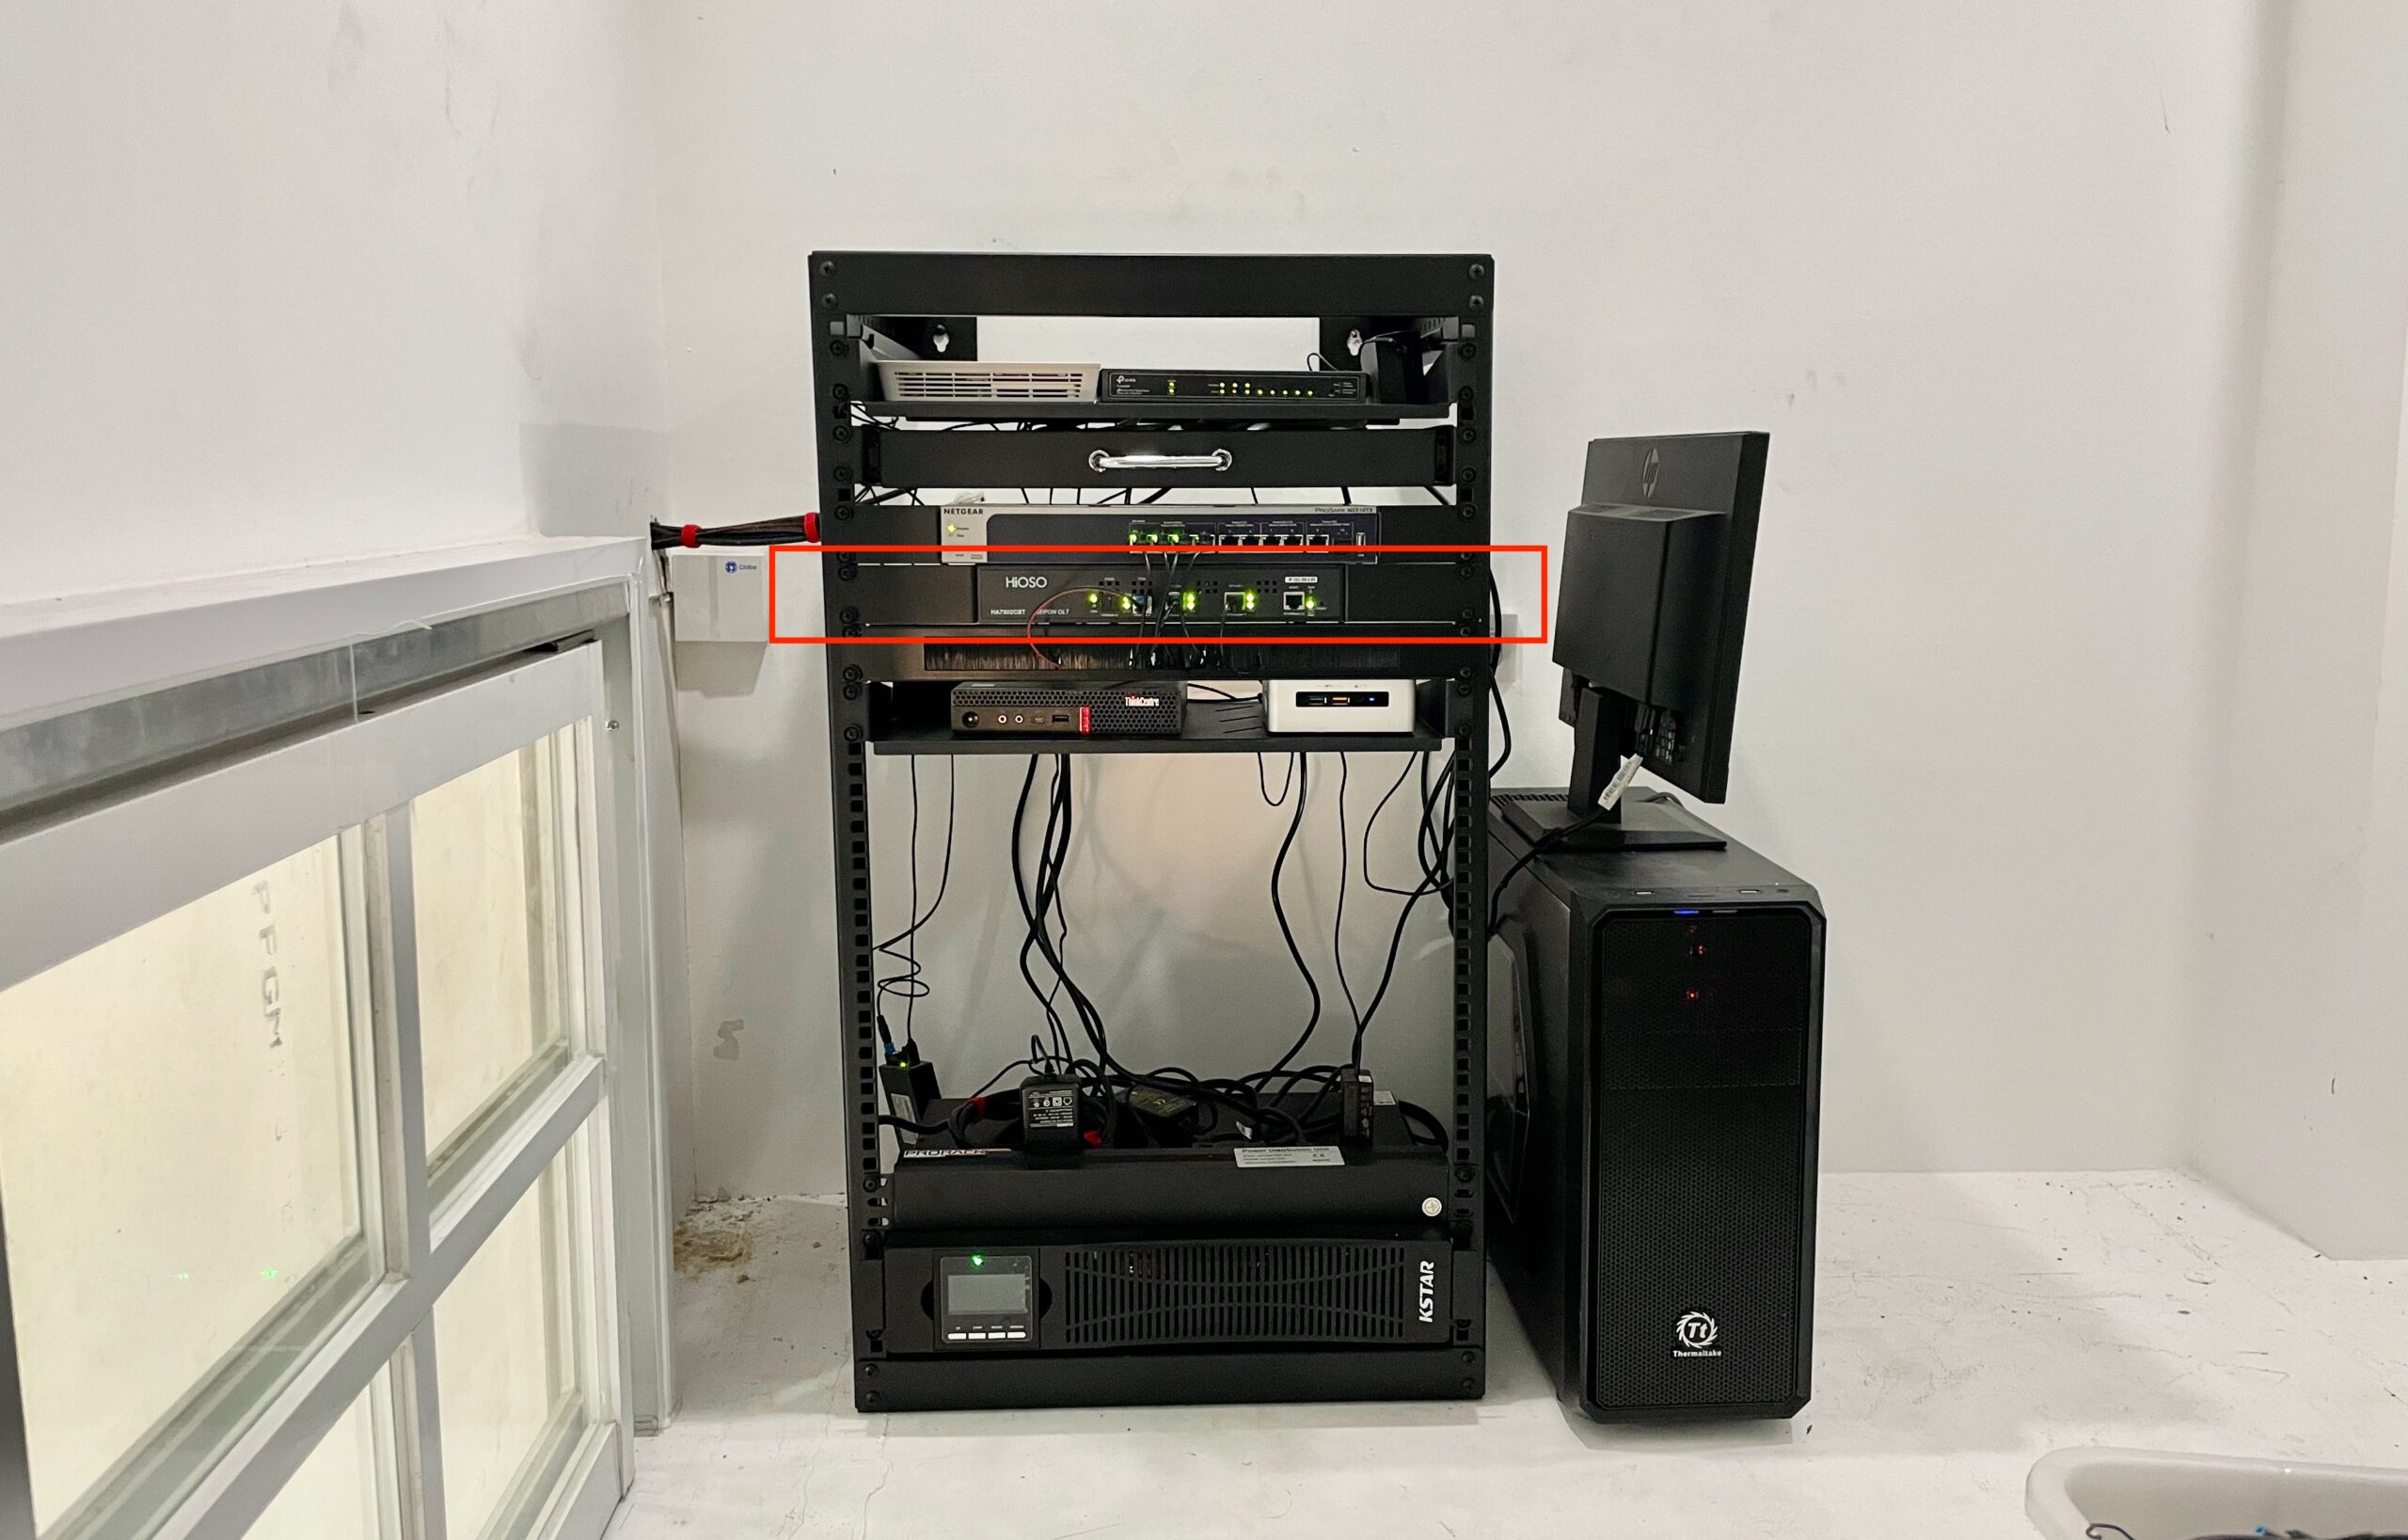
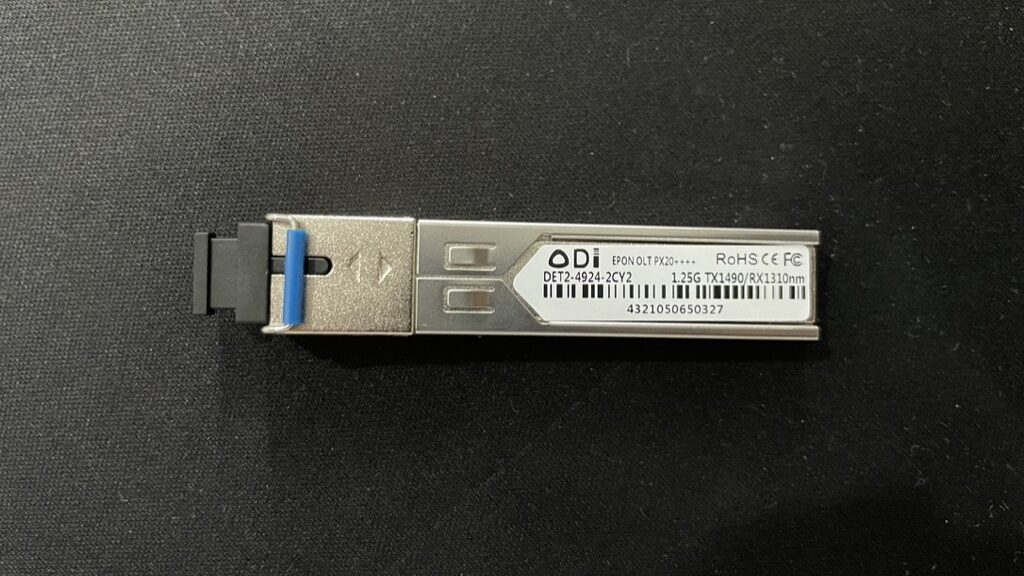
OLT: Optical Line Terminal
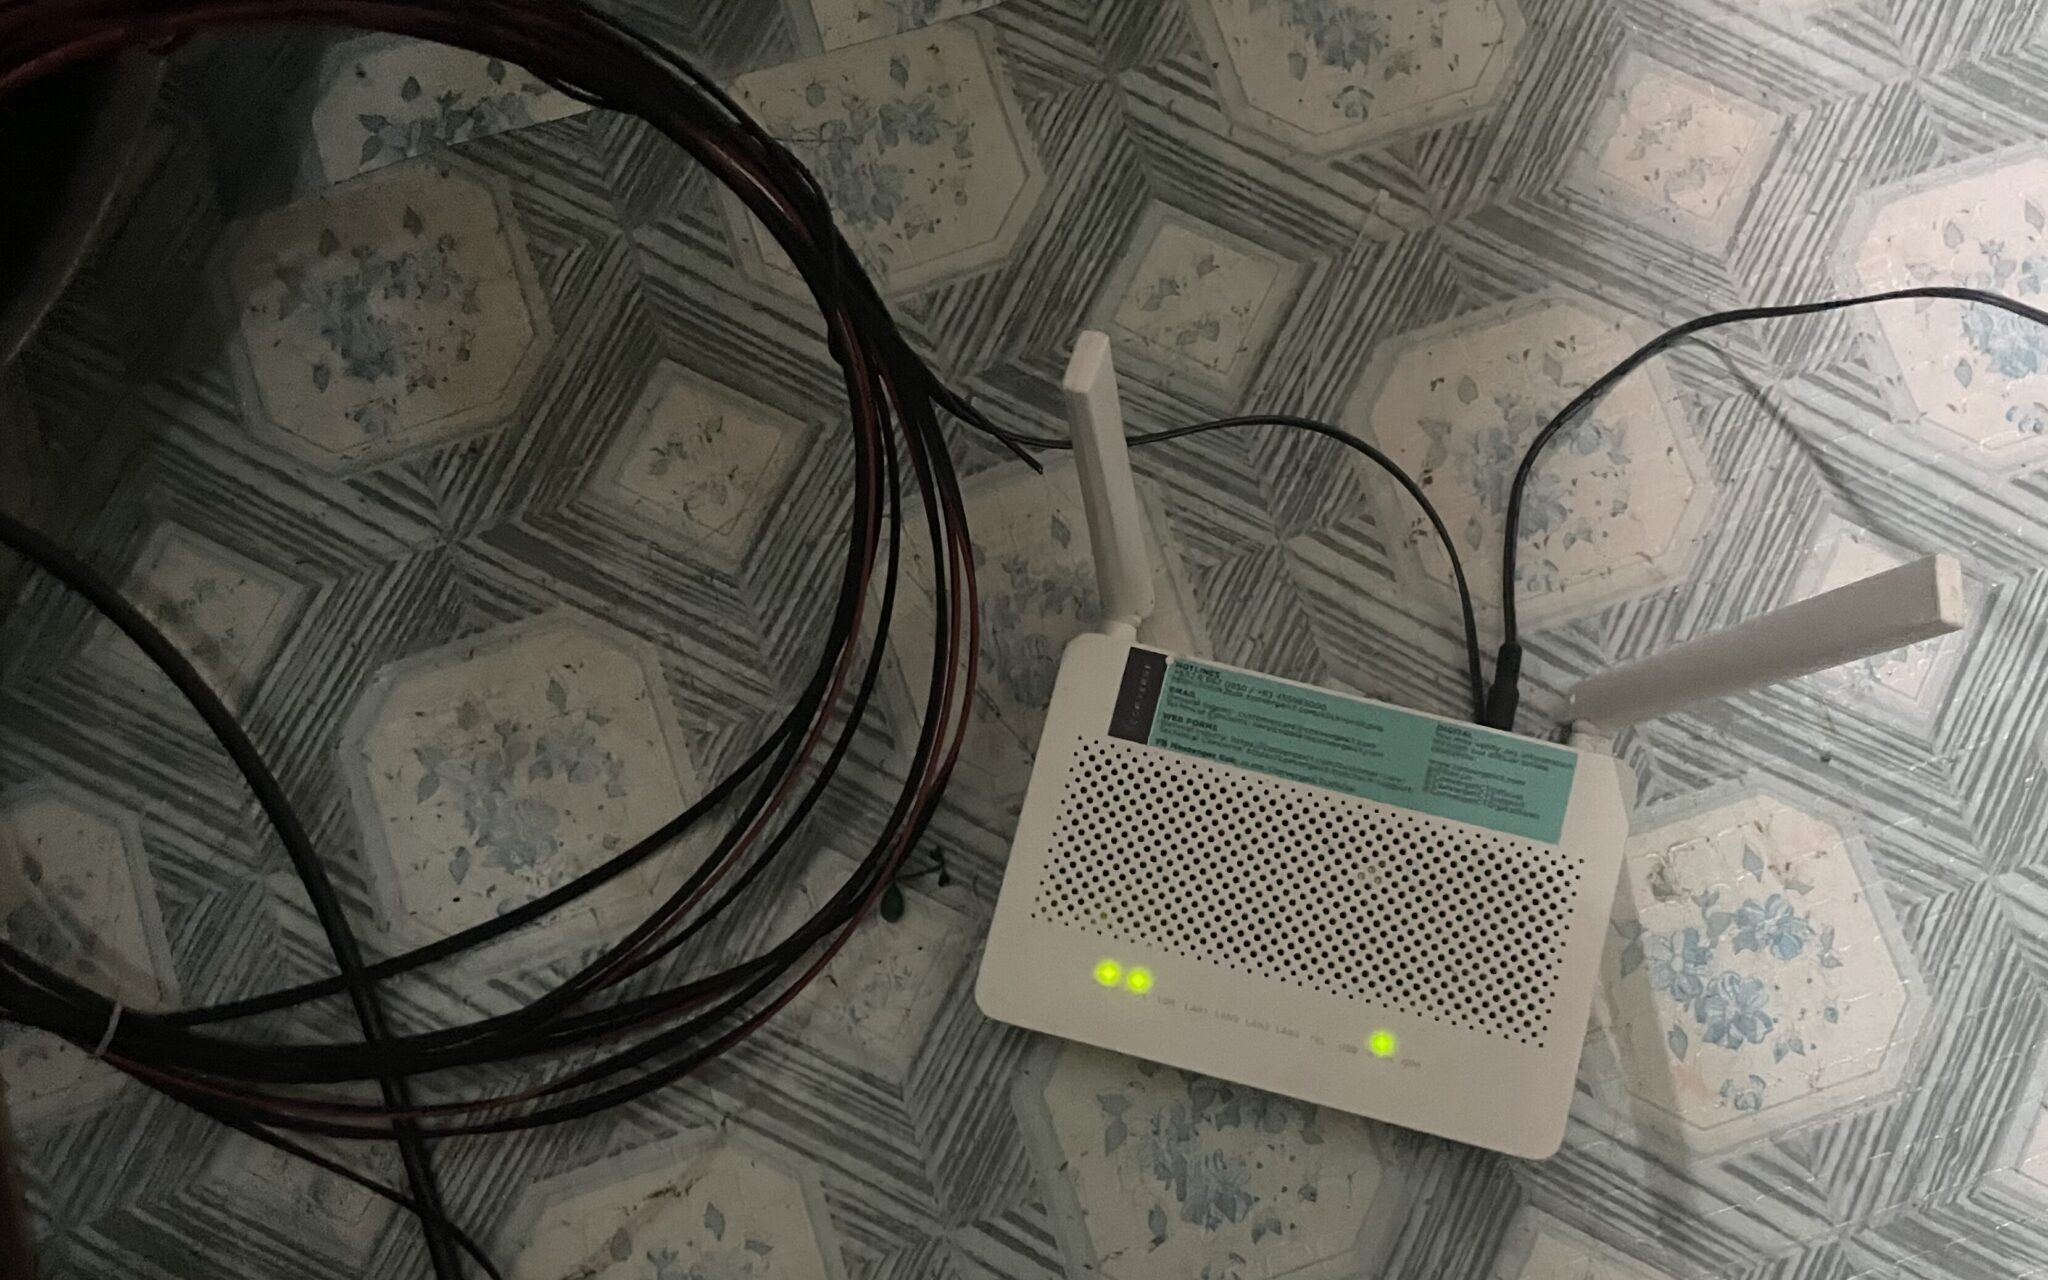
EPON OLT on my server rack
This is the most expensive part of this hobby. OLT is like the network switch for fiber. It allows transmission to multiple ONU (more on this later).
I chose the cheapest OLT I could find, specifically looking for a local supplier so I can quickly get a replacement if ever it malfunction.
I got a HiOSO HA7302CST. It’s an EPON OLT that has 2 PON ports that can connect up to 128 ONUs.
PON: Passive Optical Network
9 dBm EPON Module
PON is what the technology is called. It’s passive, meaning it does not require electrical components to split or combine the signal. It literally uses light to transmit data.
There are 2 common types of implementation. EPON and GPON. EPON has symmetrical speed, GPON have faster downstream speed. GPON is what PLDT, Globe use as it has more capacity per fiber line. EPON is generally cheaper.
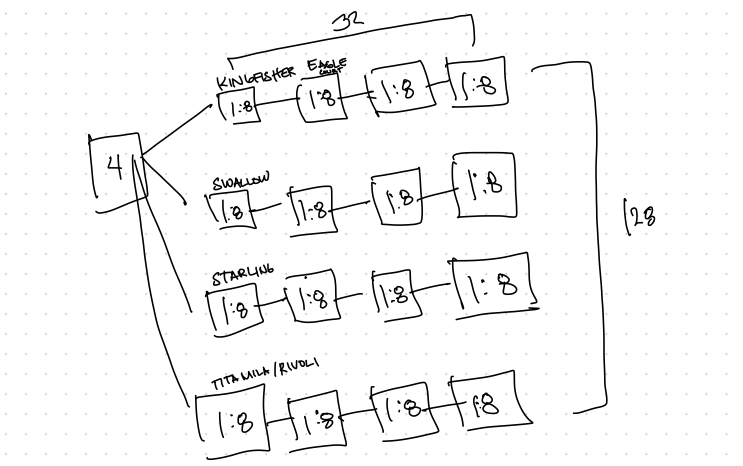
ODN: Optical Distribution Network
Planning the layout of my NAPs
ODN is how the fiber are physically laid out.
We have a couple of properties in the same village. What I did is I installed a 1:8 NAP on each property to provide internet service to the house itself and it’s nearby neighbors.
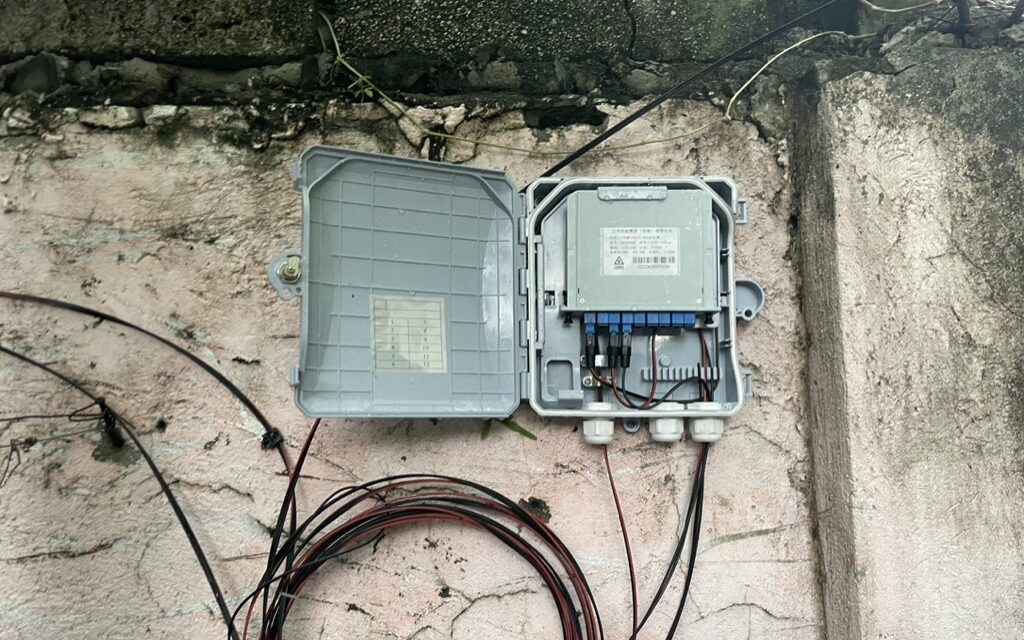
NAP: Network Access Point
First ever NAP installation. Daming excess wires!Improved later on
NAP are the boxes where the signal from PON is split. It can be split on different ratios with different signal loss depending on how large the split is.
Splitter Type
Insertion Loss (dB)
1:2
4.0
1:4
7.4
1:8
10.5
1:16
13.5
I opted to use 1:8, since I’m not seeing myself acquiring a lot of subscribers.
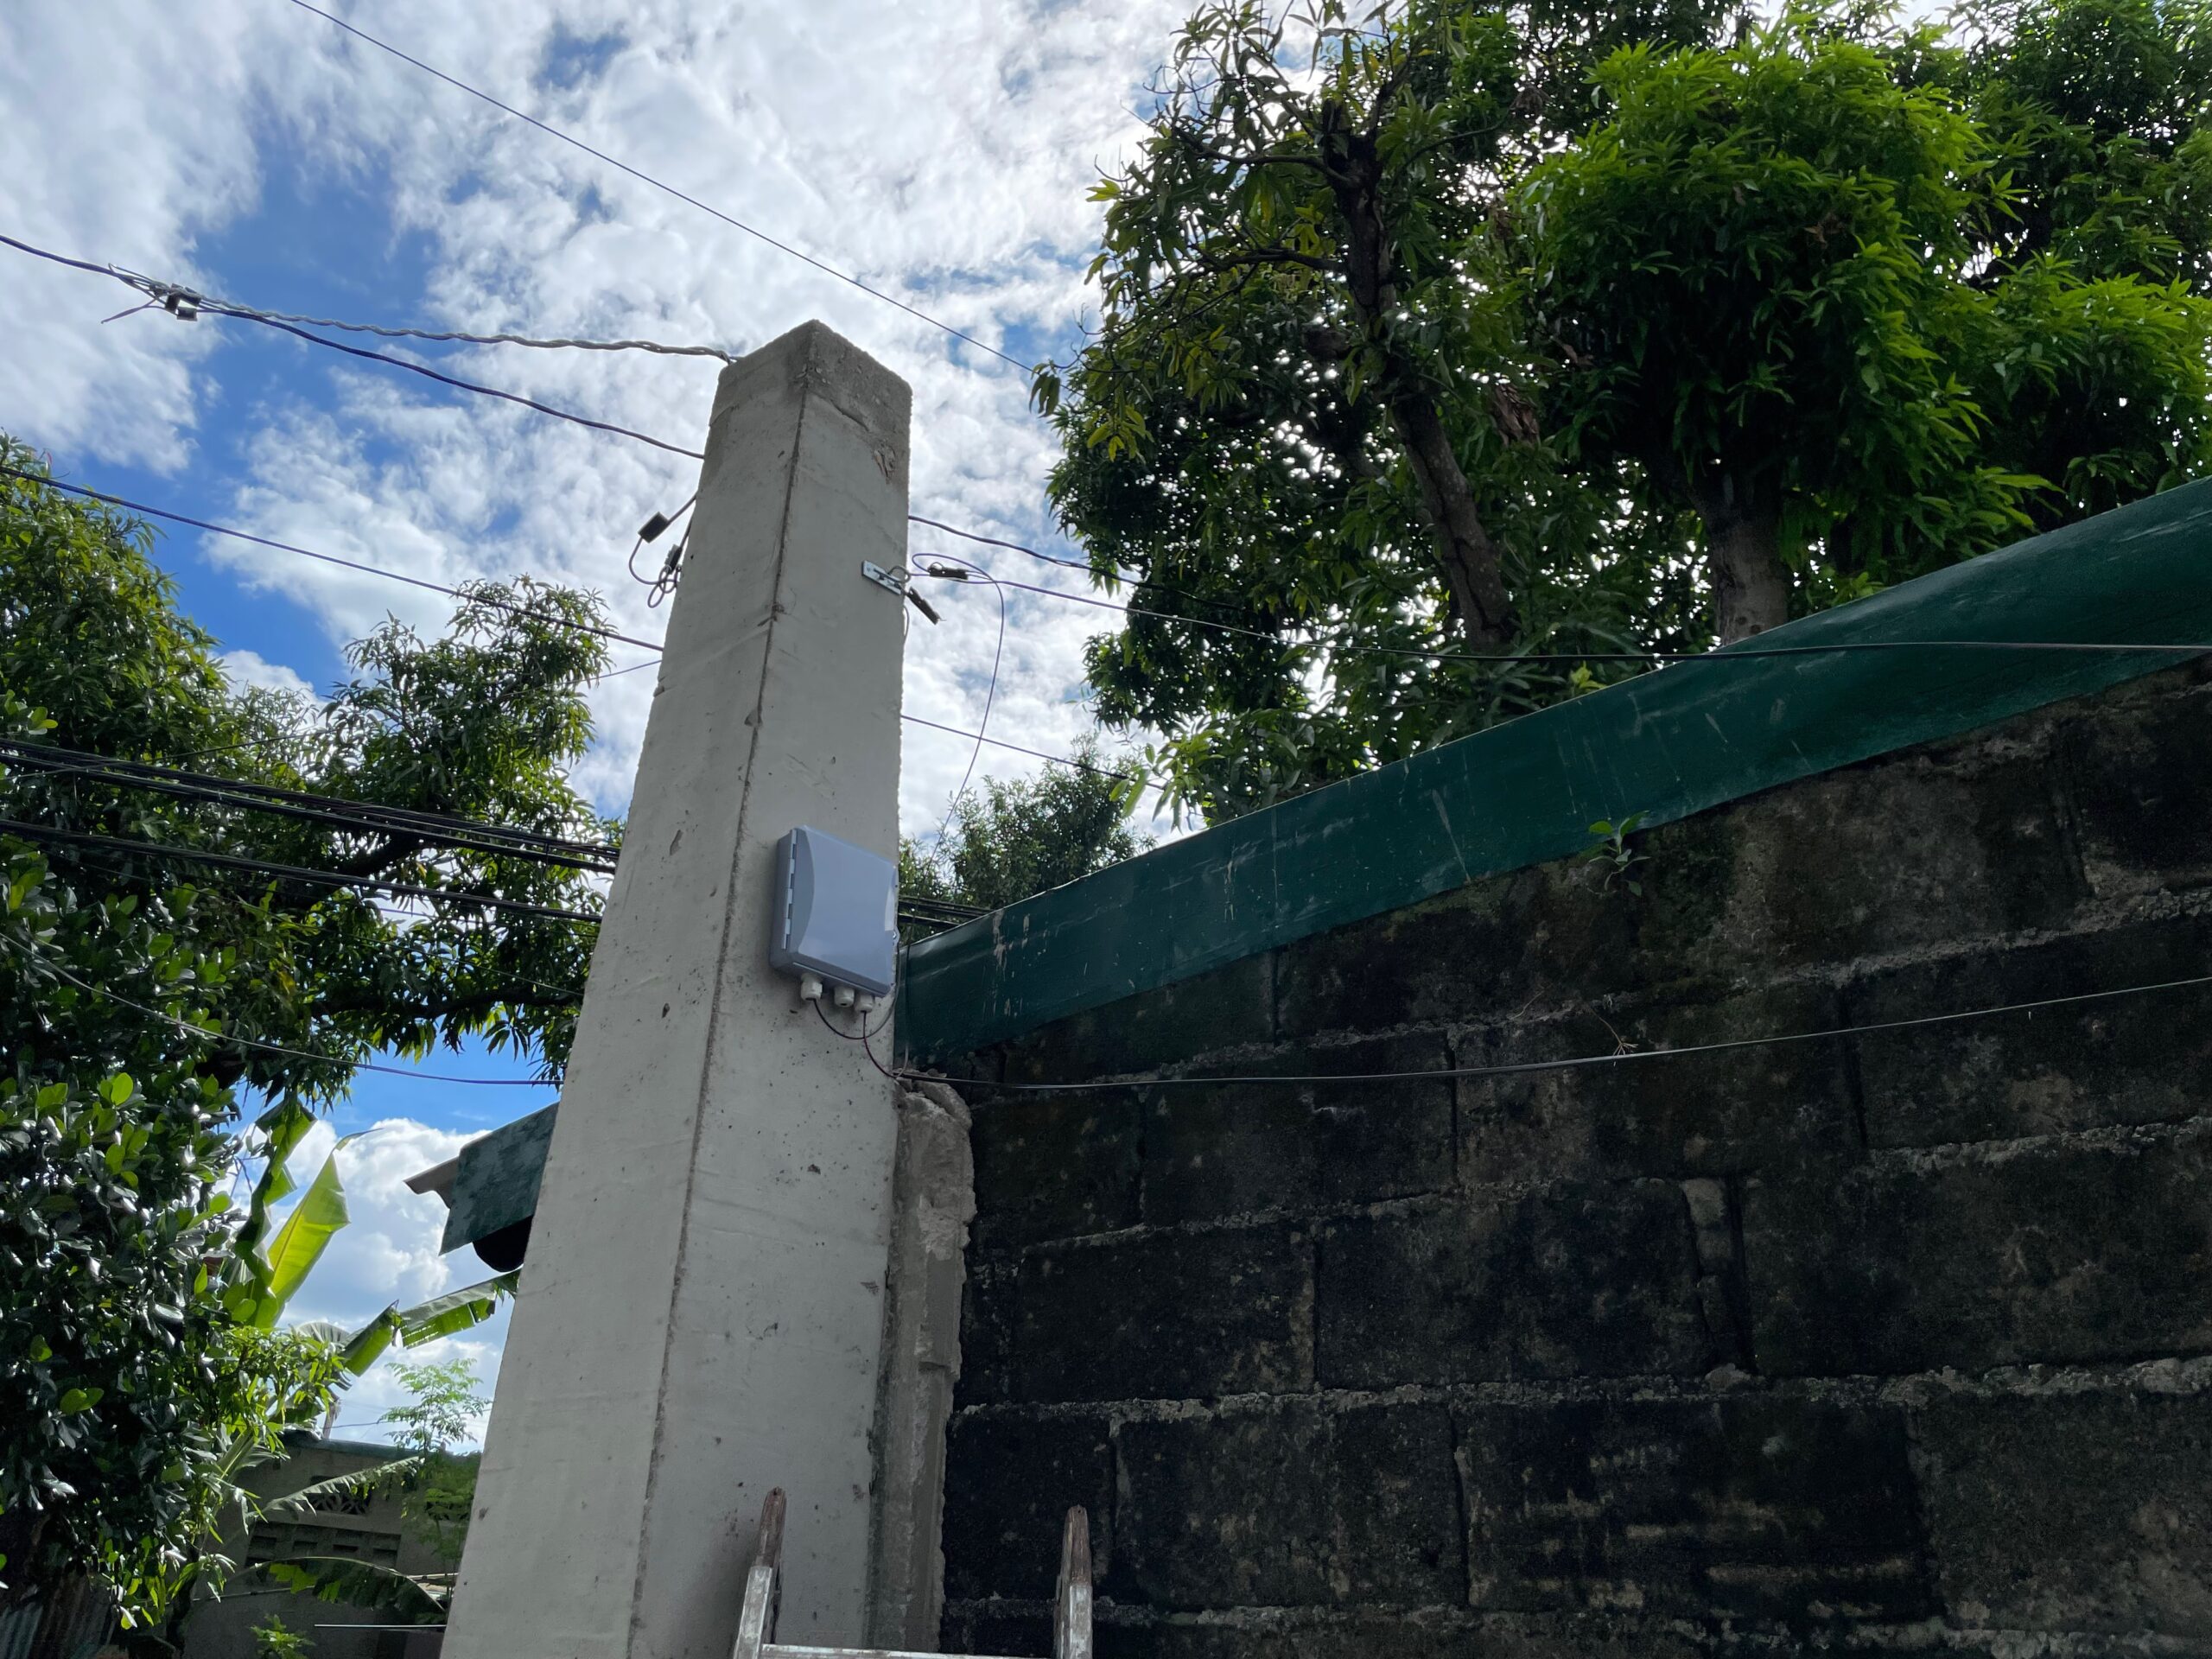
ONU: Optical Network Unit
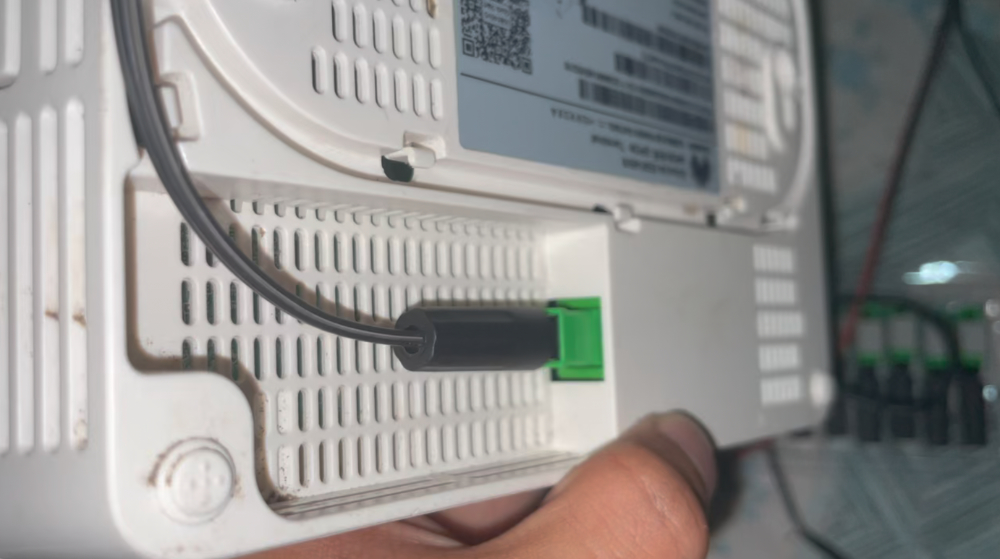
A patched Converge 5v5 modem connected to my EPON
ONU are the modem that converts the signal from fiber and make it available through Ethernet and WiFi.
Connection information from ONU to OLT
I learned that Huawei EchoLife HG8145V5 is very popular modem in Facebook Marketplace because it’s what the major telecom uses. Unused modems from disconnected/terminated subscribers are being sold in the second-hand market.
It’s possible to reuse it outside the telecom’s network because there’s an exploit for Huawei modems that allows root access to the device and convert it from GPON to EPON ONU. This was fascinating too!
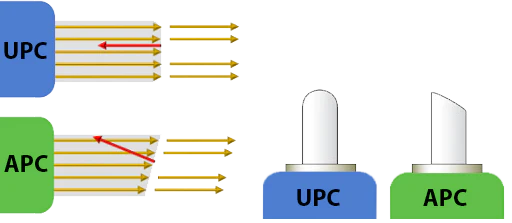
SC-UPC / SC-APC: Subscriber Connector
There are two types of subscriber connectors. SC-UPC (Blue) and SC-APC (Green). The difference is how their end is polished (angled vs not angled). It can be interchangeably used, but it will incur a notable signal loss.
Terminating a fiber line
I learned how to terminate it myself. So much easier than terminating a CAT6 cable.
Loss Budgeting
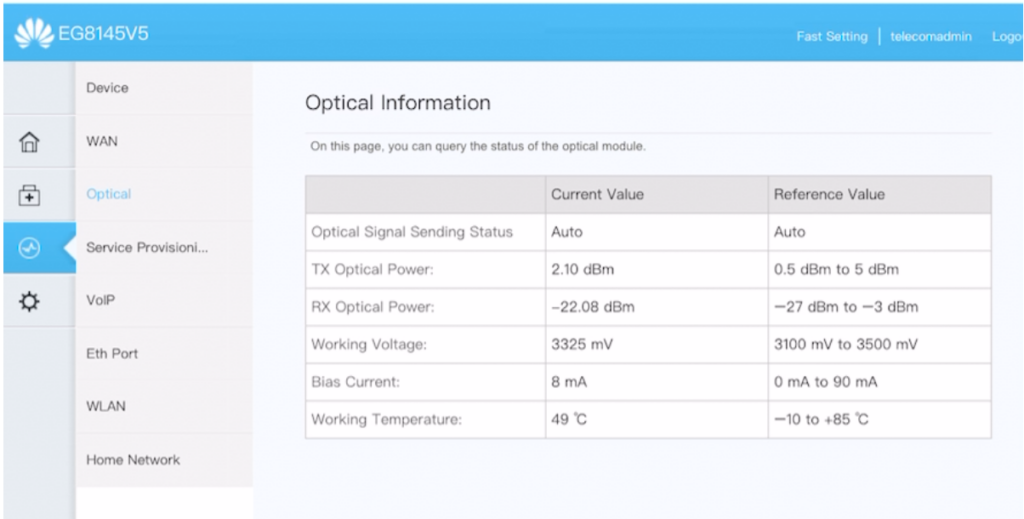
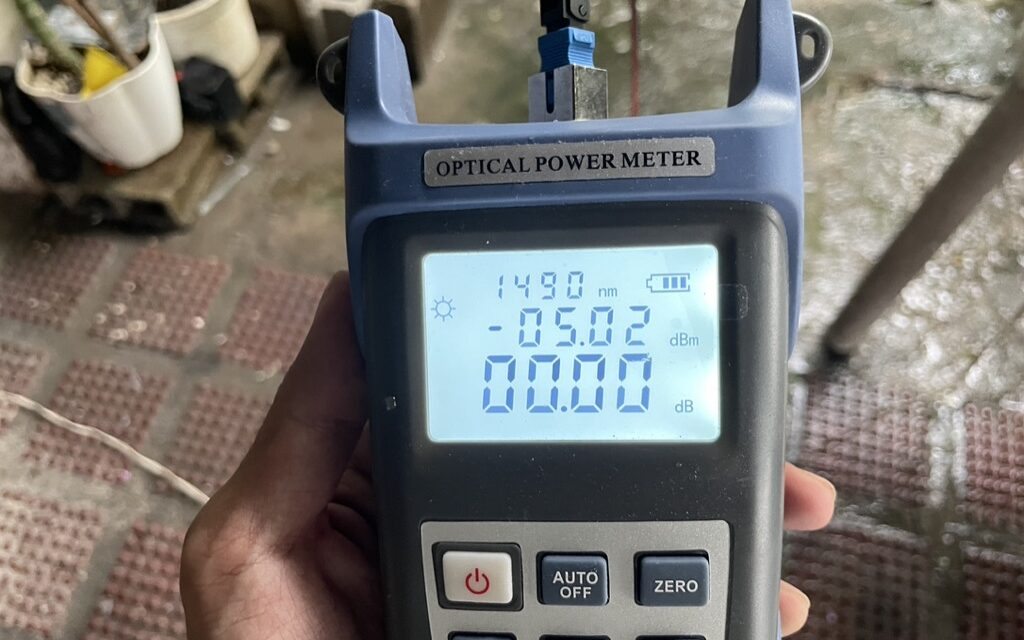
Optical Power Meter to check signal strength: -5.02 dBm
From the OLT, you start with the PON module signal which in my case is 7-9 dBm depending on the module. The loss must not to be more than -27 dBm when it reaches the ONU.
For every split and every termination, there will be signal loss incurred.
A computation is required to get an estimate of the final signal strength. I learned that it’s called loss budgeting — making sure that the signal does not go below the threshold from OLT to ONU.
-
I’m now an ISP for a couple of houses in village. It’s mostly family and friends. No plans on expanding, just wanted to scratch an itch and learn about the thing. Fun stuff!
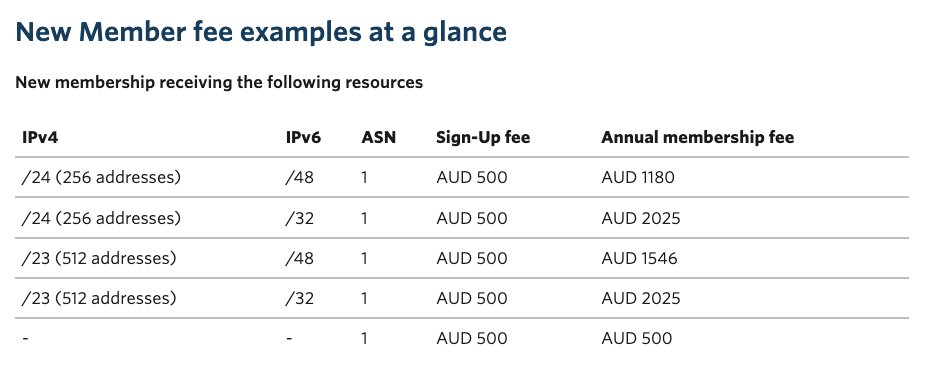
I’ve been curious on getting my own ASN and IP address.
The process is to register and buy in your region’s internet registry. In my case, it’s APNIC. APNIC is more strict than other registries in terms of registration and fees.
At the very minimum, I need 500 AUD registration fee and 1180 annual fee to keep a /24 IPv4. Which is more than the money I want to spend. On top of the fees, it looks like only a business entity can register, which I don’t have.
When I learned the term about multihoming, I revisited my interest again to have a VPS to setup as a VPN for my network.
I wanted it to be hosted in the Philippines because of latency. Major hosting providers uses Singapore or Hong Kong to cater the PH market. But the latency is just too high at around 30ms.
I found one in LightNode. The cost is reasonable too for $7.7 USD/month.
The drawback is it looks to be limited to 100mbps only. Which is still reasonable.
Checking the hops, it looks like they are hosted within PLDT’s data center:
This is why the latency is at a very good range of 7ms. It does hop at one NAT which I think adds the 2ms. Overall this is good.
I’m going ahead and continue to use this and integrate it with my home network setup.
I’ve been considering changing my router from Omada’s R605 to something more configurable.
Omada is great for managing switch and access points. Sobrang seemless mag-add ng bagong device. Routing-wise, it works naman pero biggest gripe ko yung detection ng WAN connection. It can only do it per minute.
Kaya I’ve been looking to switch to Mikrotik CHR.
I found this blog post with benchmarks. VyOS came on top. I was not even aware of VyOS before. Kaya bagong rabbit hole nanaman. I’ll give it a shot soon.
VyOS
It supports PPPoE which is the main reason why I’m looking to switch sa Mikrotik.
I have quite a few mini-PC that has only a single gigabit port. I’ve been
considering and researching how to expand those to have an extra port. One of
those options was using a USB to Ethernet adaptor.
Now, I’ve looked at this option before. Ang nakuha ko lang puro discouragement
na hindi siya stable.
Why it’s not recommended
Doesn’t offload all processing from the CPU, causing high CPU usage.
When fiber internet was rolled out at my Mom’s home, I had this itch to provide internet for the whole compound. She have an ice cream business and she provides housing to ice cream vendors (sorbetero) together with their families. Around half the compound are sorbeteros. Most of which will benefit if they don’t have to add another expense for internet.
Fiber made bandwidth cheap (P2699 for 100mbps). I knew that a 100mbps plan is more than enough for everyone there. The bottleneck is the device the comes with the internet plan. The device PLDT provides is actually an all-in-one that combines a modem, router, switch, and an access point (WiFi).
To increase coverage, I need to split out the access point and use a separate device.
Project goal
Share internet that covers the whole compound
Performance should be adequate for remote learning or work-from-home (Zoom, Google Meet)
Have the same experience as having their own WiFi
Roaming-capable (when people move, their device will automatically switch to the next nearest access point)
Minimal restrictions
Implementation
I opted to go with a business-grade solution. Big factor is a single dashboard to manage all access points. I was initially considering Ubiquity, but then found out about TP-Link Omada which is half the price.
I get notified through Omada app if the internet is down or if any of the access point stops working
There are only 2 SSIDs (WiFi name) for 7 access points. One personal and another for the free WiFi. Each has it’s own subnet.
Free WiFi’s subnet is limited to 50mbps to guarantee that the personal network always have bandwidth available
Each device is further limited to 20mbps (initially this was 10mbps but utilization rate was low, I bumped it up to 20mbps)
I had to block Mobile Legends because kids from other compound started coming to our compound to have a tournament until late night. Blocking is just another ACL rule to block port 30000 to 31000. ML stopped loading after this has been applied.
Interesting metrics
7 access points covered more than 20 households
Average internet utilization is only around 20%
Average traffic is around 180GB download and 15GB upload daily
Max connected clients so far was 90+ devices
It’s been running since May 2021. Things has been relatively stable. Downtime was only when there’s no electricity.
Cost
Next step: better cable management
Item
Unit Price
Qty
Total
TP Link Router R509
₱2,180.00
1
₱2,180.00
TP Link 5-port PoE Switch
₱1,440.00
1
₱1,440.00
TP Link EAP110-Outdoor
₱1,400.00
2
₱2,800.00
TP Link EAP225-Outdoor
₱2,900.00
4
₱11,600.00
TP Link EAP235-Wall
₱2,900.00
1
₱2,900.00
Thinkcentre m73p
₱2,500.00
1
₱2,500.00
Omni plugs
₱442.77
1
₱442.77
Waterproof Junction
₱580.23
1
₱580.23
305m CAT6 outdoor cable
₱2,250.00
1
₱2,250.00
Total
₱24,443.00
I could have implement the whole thing 50% cheaper but it’ll be a pain to maintain and less fun to do. Since I’m doing this for free, I might as well enjoy haha.
Why
I see this as a hobby. I’ve always been fascinated with computer networking for as long as I can remember.
The 25k I spent could’ve easily been another gadget where only I would benefit (and add another stuff to my life). Spending it on this instead accomplishes two things: 1) I had fun planning, figuring things out, and setting it up 2) It has good net effect because a lot of people are getting value from it. And that makes me happy.
I also learned a lot. I finally understood how VLAN works. It’s nice that I can map an SSID to a VLAN to have it’s own network. Power-over-Ethernet was also nice because there’s only one cable for power and data (CAT6).
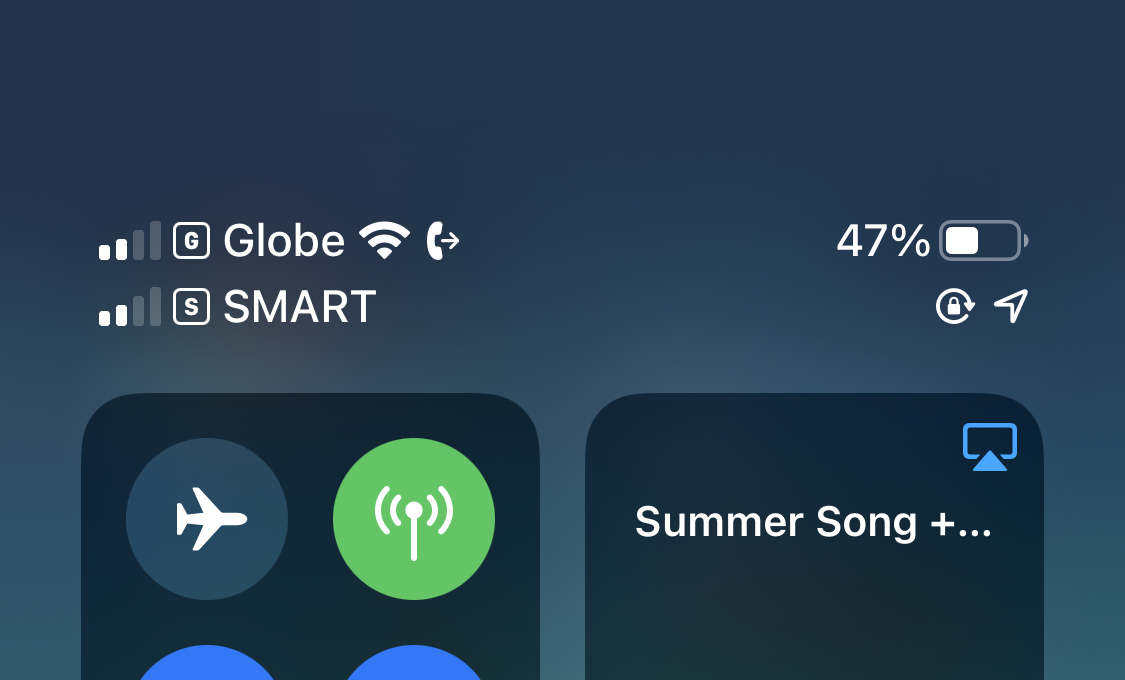
My role at work is partly DevOps. This means that there are rare instances that even if I’m not at home (where internet is reliably available), I might get an alert where a server is not working as it should.
I have mobile data plan from Globe for that. Globe is usually good within cities. The more remote I get though, the less reliable it becomes. My initial solution was to get another phone and line from Smart (competitor).
However, I have minimalist tendency. Paying for two plans monthly feels wasteful. Especially during this pandemic where I barely use both.
I also didn’t like having two phones with me all the time.
Solution: Globe eSim + Smart Magic Sim
My primary network is Globe. I don’t mind paying monthly for this because it’s the same number I used for years. Good thing that they offer eSim which is supported by my phone.
The process was easy. Go to Globe store, ask for conversion from physical sim to eSim. They will then provide a QR code a phone can scan to register the number. That’s it. The eSim solution eliminated my need to carry two phones all the time because I can put in another sim to my phone.
For Smart, I recently found out that they are offering a new product called Magic Sim. It has non-expiring data at P399 for 24GB. Non-expiring! I only need to pay for it when I use it. I dropped the Smart plan I used to have which I was paying for P3500/monthly (easy to justify pre-pandemic) and replaced it with this one.
End result is I have a single phone with two sims from different network. I’m only paying monthly for my primary network. My phone auto-switches network depending on availability of internet.
#
I know this is borderline penny-pinching (which I try not to do). But I like keeping my personal lifestyle low-cost. I also enjoyed eliminating the waste I feel every time I do my budgeting.